How to Create Music Visuals for Live Performances
TL;DR: In 2026, adding music visuals to live performances is essential for engaging audiences. Whether you’re a DJ or a band, audio-reactive video mapping transforms ordinary stages into immersive experiences. Using plug-and-play software like HeavyM, performers can instantly sync over 1,000 generative visual effects to their live music without coding.
Some live performance references
If you’re a fan of electronic music, you’ve probably already noticed that more and more artists and festivals are now focusing on stage decoration. It usually consists of fixed set elements, sometimes mixed with video projection and LED screens. Custom or stock backgrounds are often integrated to enhance the visual appeal and branding of live performances. Events like Tomorrowland or Dour Festival are very good examples. As for the artists, we can mention, amongst the most famous, names like Amon Tobin, Aphex Twin or Eric Prydz. They were pioneers in the use of music responsive visuals on a large scale stage.


However, the implementation of such installations requires long design times and the collaboration of a dedicated creative team. Indeed, the high resolution of the images to be manipulated and their ability to react to the music are complex problems to solve. To guarantee a perfect synchronization between sound and images during a live performance, latency times must be as short as possible. In addition, it is often necessary to use several networked computers and to synchronize them with each other. In addition to creative skills, there is a real technical expertise. All these elements contribute to the overall production value and professional polish of the show. All the processes to be mastered can be grouped under the term of VJ technologies and can be broken down into techniques such as computer graphics, computer programming, audio and video signal processing, live recording…


Focus points for live visual effects: FPS and latency.
When creating music responsive visuals for a live performance, the two focus points are the fluidity of the visual animations and the latency between music and video.
It is absolutely necessary that the images are generated at a rate of at least 24 frames per second. This data is called the framerate and is expressed in FPS (frames per second). If you are below this value, for example at 12 frames per second, all animations will appear jerky. In the case of fast animations, it is often necessary to aim for a value above 24 FPS: 30 or even 60 FPS.
For example, in video games with very fast animations, gamers prefer framerate to resolution so as not to miss any action: better experience at 60 FPS in Full HD than at 30 FPS in 4K. Thus, there is a trade-off between better resolution or better FPS.

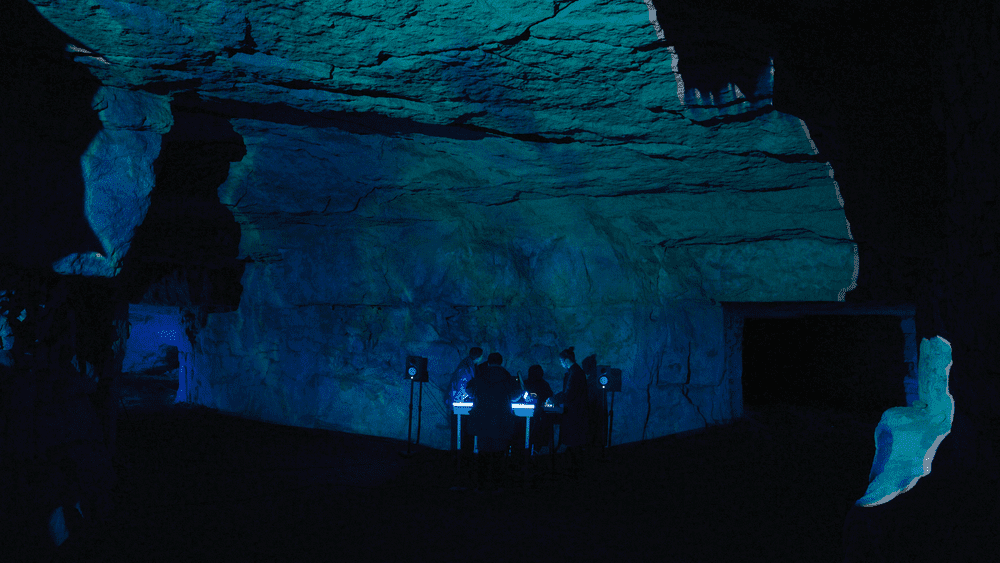
An example of a live performance using music reactive visuals
The Stone Mine Mapping performance is designed to explore the interactions between sound and image and to question the place of the spectator. It is a real-time audiovisual performance in which music and image are created live.
The artists of this live performance
The music is created live by Control Random using a Eurorack modular synthesizer system. His compositions, mostly performed live, can be found on his Instagram and Bandcamp profiles.
Marin Scart and Neurotypique from Maison Sagan have created an image generation system composed of an analog part based on modular synthesizers and a computer part with TouchDesigner and HeavyM software.
Finally, Jean-Michel Lightadded DMX controlled lights to better appreciate the space of the quarry, similar to what is experienced at the Festival of Lights, Lyon.
In practice: the solutions used for visual effects of the live performance
Live performance system overview

The sound source: modular synthesizers

It is an assembly of independent modules where each one fulfills a fundamental function: oscillator, filter, effect,… The combination possibilities are infinite and allow artists to produce music that is unique to them. Control Random and Neurotypique have used the Eurorack system which is a standard format for modular synthesizers. All the available modules are listed on the Modular Grid website. There are more than 11,000 of them!
Computers
The visual effects computer
The image distortion computer
The video mapping computer, which is used to fit the images to the space, is a laptop with Windows 10, an Intel i5 processor, an Nvidia GeForce GTX 1050 graphics card and 8GB of RAM.
Only HeavyM is running on this computer.
For more tips on what to look for in a video mapping computer, check out the dedicated computer article.
The projector
The projector used is an Optoma WU630 6000 lumens Full HD with a short focal length optic of ratio 0.9.
For more advice on choosing a video projector, please refer to the dedicated article on video projectors.
LED lights

The lights used to illuminate the tunnels on the sides are Astera Titan Tube on battery.
Responsive audio visual effects softwares
Touchdesigner
HeavyM
HeavyM is developed by Digital Essence and allows you to create music responsive effects in a few clicks. In the Stone Mine Mapping project, HeavyM was used on two levels. The first is the use of processing effects shaders, on Touchdesigner video outputs. The second is the distortion of the overall image to fit the projection space.
HeavyM directly integrates audio analysis features to give you the ability to make visual effects react to music being played. All you have to do is connect the computer to an audio source with a jack cable for example. You can also use an external sound card.
Communication between the Performance's components
To generate music responsive visuals, the various hardware and software elements must necessarily exchange information.
Modular synthesizers send audio information through a particular module: the ES-9 Expert Sleepers. This is an analog-to-digital converter that converts electrical signals into digital data that can be understood by Touchdesigner. It is not necessary to have this type of hardware because HeavyM directly integrates audio analysis functionalities to give you the possibility to make the visual effects react to the music played. All you have to do is connect the computer to an audio source with a jack cable for example. You can also use an external sound card.
Once the music information is received, Touchdesigner generates the visual animations and sends them to HeavyM with a Spout link. This is a technology that allows you to send the video output of one software to another. HeavyM receives the video and, using a MIDI controller, Marin Scart applies additional visual effects. HeavyM’s output is then sent to another instance of HeavyM on the second computer using NDI technology. This allows a video stream to be delivered over a network with minimal latency. Finally, HeavyM modifies the geometry of the video to send it to the video projector, which displays it in the live performance space.
After the final output is sent to the projector, the system can render the completed video. Users can then export or download the finished visuals for further use. Some platforms also enable users to share videos directly to platforms like YouTube after the video render process.
To complete the video projection, LED lights have been added on the sides. They match the colors of the projection. The control signals for the lights are DMX messages sent over a WiFi network from Touchdesigner.
Refining Your Visuals
Refining your visuals is a crucial step in transforming your project from a simple music visualizer into a polished, professional-looking music video that stands out on any platform, including your YouTube channel. Once you’ve set up your basic music visualization, it’s time to focus on the details that will make your video truly unique and engaging for your audience.
Start by choosing a high-quality audio track that represents your music at its best. The clarity and dynamics of your audio will directly influence how your music visualizer responds and how immersive the final video feels. Next, explore the wide range of music visualization templates available in your software. These templates are designed to help you quickly create videos that look great, but they also offer plenty of options to customize the visuals to match your brand, style, or the mood of your track.
Don’t hesitate to experiment with different colors, shapes, and effects. Adjust the palette to reflect your logo or album art, or use bold colors to make your visuals pop on screen. Many music visualizers allow you to tweak the movement, intensity, and style of the effects, so you can create a visualization that perfectly matches the energy and rhythm of your audio track. Try layering effects or combining templates to develop a look that’s all your own.
As you refine your visuals, keep your audience in mind. Think about how your video will appear on different devices, from computer screens to mobile phones, and make sure your visuals are clear and impactful at any size. Once you’re satisfied, you can upload your finished video directly to your YouTube channel or other platforms, ready to share your music and visuals with the world.
By taking the time to customize your music visualization and experiment with templates, colors, and effects, you’ll create videos that not only showcase your music but also elevate your brand and connect with your audience on a deeper level.
It's your turn!
Creating music responsive visuals for a live performance requires some technical knowledge that can easily be found on the internet. On the other hand, the necessary hardware becomes more and more accessible, in terms of cost and understanding. With these advancements, users can quickly create content to promote their music, new releases, or DJ mixes—making these tools ideal for musicians, record labels, and other music professionals. Many platforms allow you to add your own logos and customize the color scheme to match your branding, ensuring your content stands out. Some tools offer free templates or features, and the process of creating visuals can take just a few minutes. After rendering, users are often directed to a dedicated page to download their finished video. These tools can be used for commercial purposes, allowing for commercial use of the created visuals in monetized projects or client work.

To be continued
Learn more about projectors
We have created a detailed guide to choosing the right projector for your needs. Discover our tips and mistakes to avoid in this guide that explains the different features step by step.
Explore the HeavyM software
HeavyM is a video mapping software that is capable of generating visual effects and projecting them on volumes, decorations or architectural elements. HeavyM is Mac and Windows compatible.