How to set up your projector for projection mapping!

We all want our live projects to go as smoothly as possible, don’t we? And a projection mapping project is certainly no exception as setting up a projector is no thing to be overlooked. So let’s assume you know what you want to do, you have your projector, and you know where you want to project your content, that’s a pretty good starting point, right? But say that you’re not on-site, and you’ve only seen the place in blueprints or pictures. Then, how can you make sure the distance needed between your projector and the projection surface will fit with the constraints of the area? This article explains how to set up your projector perfectly for a projection mapping.
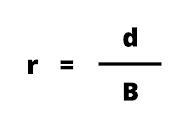
Without further ado, let us reveal the ultimate formula to always make a success out of your projection mappings!


“r” being the throw ratio
“d” stands for throw distance
“B” is the image width
This might not make much sense for you now, right? But in this article, we explain in detail this formula, its components and how to use it. You’ll find that this formula can be extremely helpful, as it was for many cases and you’ll want to start your projects with it.
If you’d rather have a more visual explanation, we also made a video on this subject, with a practical case. You’ll definitely know how to set up your projector after watching this, so check it out!
R is the throw ratio
The higher the throw ratio, the longer the throw distance. In other words, the bigger R is, the further you can get away from your projection surface to have an optimal image.
R is related to the type of projector you have, simply type in the model of your projector + throw ratio on Google to find it. (ex: Optoma HZ40 throw ratio)
Ultra short throw : r < 0,3
Short throw : 0,5 < r < 1
Standard throw : r > 1
Types of projector
But first things first, let’s make a quick sidenote on our most important element: projectors. There are 3 types of projectors, ultra short throw, short throw and standard throw.
Ultra short throw
Ultra short throw projectors generally all look the same, you can often see them in classrooms or meeting rooms. They are put on the ground or on the ceiling or sometimes on the same wall as the projected surface.
Their throw ratio is low (r <0,3), they therefore need to be really close to the projected surface. For that reason, they’re not necessarily the first choice in terms of projection mapping. For example, they’re not optimized for three dimensional surfaces because of the very short throw distance.


Short throw
Short throw projectors are perfect if you need to project images but don’t have lots of space around you. These models are often seen in apartments or bedrooms, and generally used for leisure purposes.
Their throw ratio is 0,5 < r < 1. This is the typical case when you don’t have much distance from the projected surface and relatively big spaces to cover.
There is a maximum throw distance you cannot exceed, otherwise the projected image won’t be of optimum quality and will get pixelated.


Standard throw
Standard throw projectors simply offer much more distance than short and ultra-short ones. Their throw ratio is r > 1. They offer much more distance than short throws so they are optimal if you don’t have any short distance constraints.
If you want to know more about the perfect projector for your project, regarding luminosity, lifespan, resolution.. We have a full guide for that, be sure to check it out!


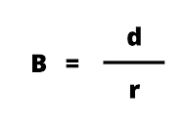
B is the image width
It is the width of your projected image. Or the length. Actually, either way, in projection mapping it’s actually the longest side of your image. Similar to the throw distance, the image width can also be in any measure unit.
So there we know all the details of our formula’s components. Therefore, we have all the ingredients to set up our projector perfectly for a mapping! In fact, by just knowing 2 of our components, we can easily find out the third one.
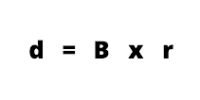
In fact, if


then we know that,


and


For example
How can I find out at which distance I can put my projector from the projection surface, depending on my video projector and the size of my surface?
Let’s say we have our projector, which is a short throw lens with r = 0,75. We know we want to project on a structure that is 2 meters wide so B = 2. And we want to find out at which distance D we need to put the projector from the projection surface. Well, here’s our formula!
If R = D/B, then D = R x B. Let’s replace it with the information we have. D = 0,75 x 2 = 1,50.
So, as D (distance) = 1,50, we know that we will need to be at least 1,50 meters away from our projection surface.
Be sure to check out our video dedicated to the subject! It looks a lot easier to set up your projector when shown the right way.
All these advice are especially helpful for your prep work, before you get on site, or when you start conceiving the project. Every aspect needs to be finetuned and tweaked when you have all you need at hand.
Do you know what’s even better than knowing how to set up your projector? Trying to do it for real! So get yourself a projector, think of a creative project and try out HeavyM for free to bring your ideas to life!

