

Preparar o seu espetáculo de video mapping ou exportar o seu projeto
Mapeamento fotográfico: https://www.lumenarius.com/spie-prism-awards-stage-design-3d-projection-mapping
Resumo
Concluir o seu projeto de mapping de projeção implica escolher entre uma atuação ao vivo ou a exportação de um vídeo digital. Preparar um espetáculo ao vivo requer a otimização dos ficheiros multimédia e do hardware para garantir a estabilidade. Por outro lado, a exportação converte a sua tela mapeada num ficheiro de vídeo padrão (MP4/MOV) para partilha online. Softwares como o HeavyM tornam ambos os processos simples e acessíveis, mesmo sem conhecimentos técnicos especializados.
Preparar as suas sequências
Em HeavyM, Sequências são os objetos que te permitem dividir o teu mapeamento em várias partes, um pouco como cenas ou até mesmo diapositivos! São geridos no Sequências módulo, dentro do Sequenciador.
Neste artigo, irá descobrir o que pode fazer, como organizá-los e como gerir a sua reprodução.
O que é uma sequência?
A Sequência é um objeto que contém formas armazenadas num Mapa e organizados em Grupos com os seus efeitos. Também pode aplicar efeitos, a transição, e incluir um ficheiro de áudio a isso.
Pode criar quantas sequências quiser e, em cada sequência, pode modificar todos estes diferentes elementos, o que lhe permite criar uma lista de cenas predefinidas entre as quais pode alternar facilmente.
Editado vs. Reproduzido
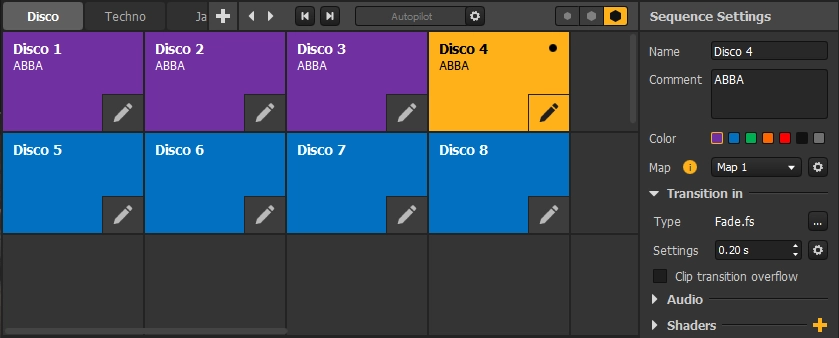
Uma sequência é representada como um mosaico na grelha do módulo. Pode encontrar-se em três estados diferentes:
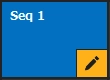
- Editado: O editado a sequência é aquela com o Editar botão ativado. Esta sequência é apresentada e pode ser editada no Tela, e as suas definições são apresentadas no configurações de sequência painel. Só é possível editar uma sequência de cada vez, e tem de haver sempre pelo menos uma. Para tornar uma sequência editável, basta clicar na sua Editar botão.
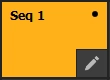
Jogou: O jogou A sequência é aquela cujo quadrado é amarelo, com um ponto preto no canto superior direito. Esta sequência é a que está atualmente a ser apresentada no saída (se uma projeção está aberta ou se é apenas uma Renderização do bico/sifão/NDI). Só é possível reproduzir uma sequência de cada vez, podendo também não haver nenhuma.
Para reproduzir uma sequência, basta clicar no respetivo mosaico (que também se tornará o Editado sequência). Se clicar numa célula vazia, não será reproduzida nenhuma sequência e a renderização ficará vazia.
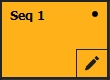
Editado e reproduzido ao mesmo tempo: A mesma sequência pode ser tanto o Editado e Jogou sequência em simultâneo. Neste caso, a sequência aparece totalmente a amarelo na grelha e é apresentada tanto na projeção como no Tela.
Nota: Quando o Jogou sequência e o Editado Se as sequências forem diferentes, aparece um aviso acima do sequenciador para indicar qual a sequência que está atualmente a ser editada no Tela. Desde a divulgação da imagem renderizada no Tela Se estiver desativado neste caso, pode causar confusão.
Definições de sequência
O conteúdo do Editado A sequência pode ser alterada no Tela, mas uma sequência também possui várias propriedades que pode consultar no painel associado, situado no lado direito do módulo:
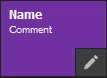
- Nome: O nome da sequência, único e apresentado em negrito no respetivo mosaico.
- Comentário: Uma pequena nota que pode adicionar, exibida no mosaico da sequência, por baixo do nome desta.
- Cor: A cor do mosaico que representa a sequência na grelha. Existem 7 cores possíveis. Isto não afeta a renderização.
- Mapas: As formas estão contidas dentro de Mapas. Pode ter quantos quiser e escolher qual deles utilizar em cada sequência.
- Transição para: Uma sequência pode ter uma transição única. Pode escolher uma para cada sequência a partir de um vasto catálogo (utilize o “…” (botão) e definir a sua duração em segundos. A transição é ativada sempre que a reprodução da sequência começa. A maioria das transições tem até parâmetros que podes ajustar diretamente a partir do painel de definições!
- Áudio: É possível adicionar um ficheiro de áudio a cada sequência. A faixa é reproduzida quando a sequência começa e pára quando a reprodução é interrompida ou quando a sequência muda. A faixa recomeça sempre que a sequência é reproduzida novamente.
- Shaders: Para além do conteúdo de uma sequência, é possível adicionar efeitos de pós-processamento (semelhantes a filtros). Funcionam exatamente como shaders nos jogadores.
Gestão de sequências
Adicionar sequências
Para adicionar uma sequência, basta clicar no + ícone numa célula vazia da grelha.
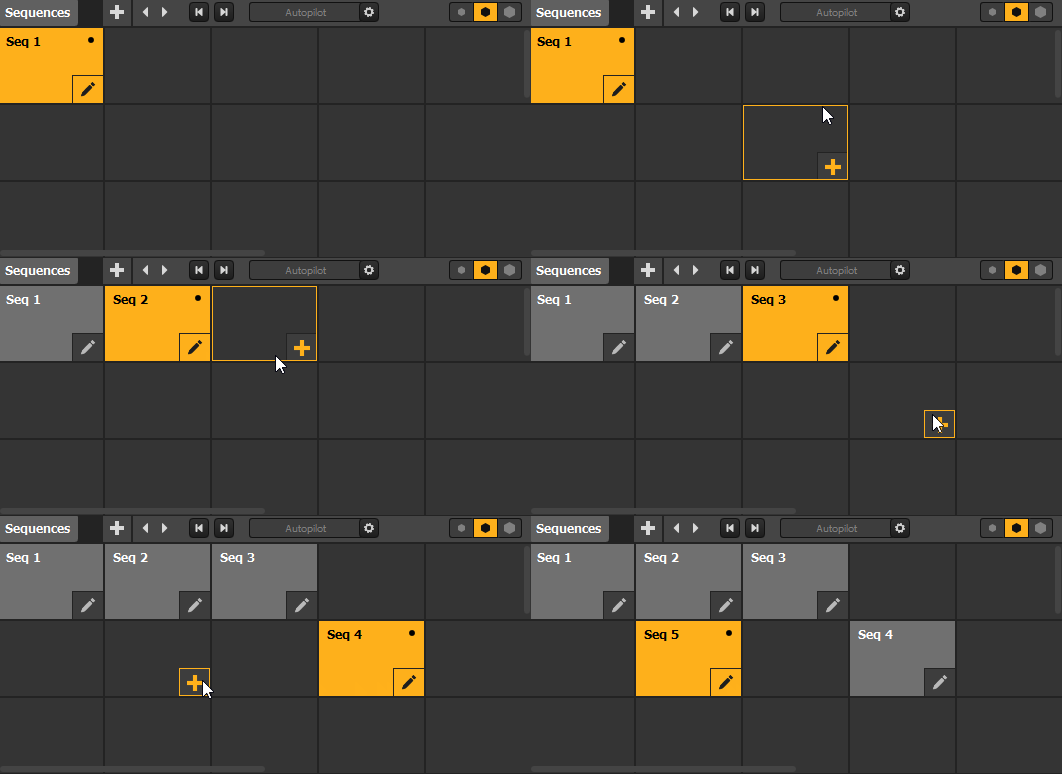
Também pode utilizar o menu do botão direito do rato para Copiar/Cortar/Colar/Duplicar uma sequência ou utilização já existente Inserir para adicionar uma nova sequência numa nova coluna, antes ou depois.
Nota: Quando adiciona uma sequência utilizando o + botão, torna-se imediatamente editável, mas não é reproduzida, permitindo-lhe adicionar sequências durante uma atuação sem interromper a reprodução. Para adicionar uma sequência que seja Editado + Reproduzido, clique duas vezes no + botão.
Organização de sequências
As sequências podem ser organizadas como quiseres—basta arrastá-los para outras células para os mover. Pode adicionar ou remover linhas/colunas a partir do menu de contexto da grelha para alterar o tamanho da matriz.
Podes até adicionar páginas de sequências. Cada página representa uma nova visualização em matriz das sequências. Para adicionar uma página, clique no + botão na barra de título do módulo. Pode então alternar entre as vistas clicando para selecionar uma página ou utilizando as setas para navegar.
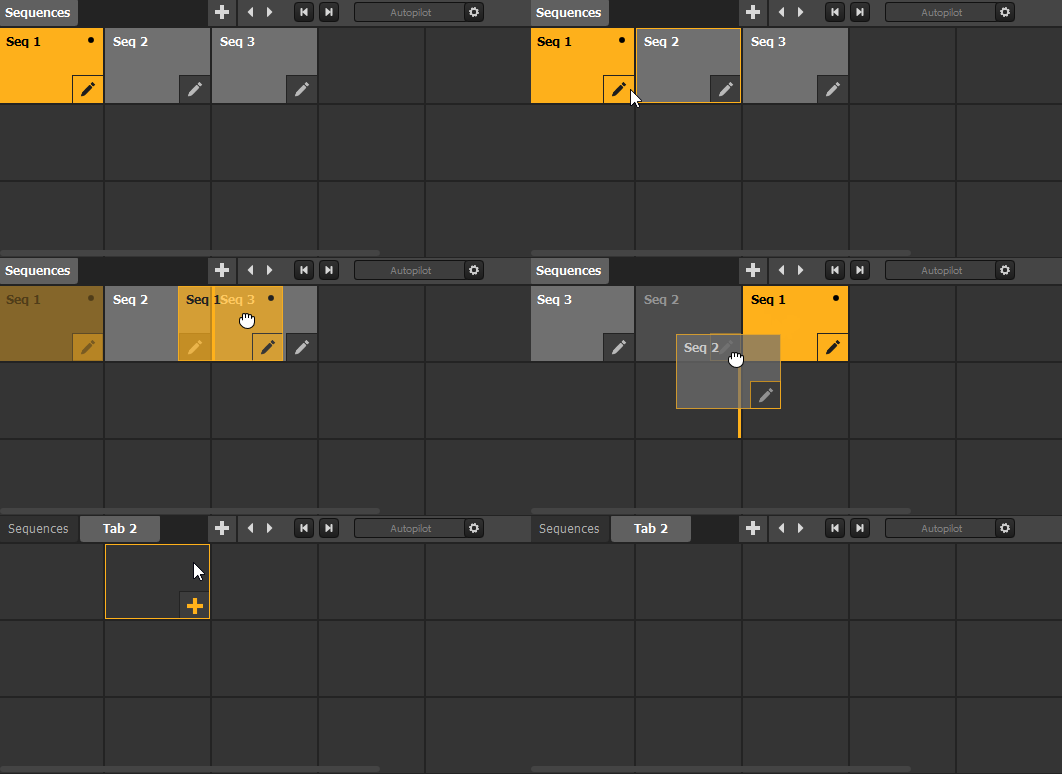
Nota: Uma sequência é única e só pode existir numa página de cada vez. Para mover uma sequência para outra página, recorte-a e cole-a.
Automatizar a reprodução de sequências com o Autopilot
Como já foi referido, para reproduzir uma sequência, basta clicar nela na grelha e ela será apresentada na saída, ou utilizar o Anterior e A seguir botões para navegar pela lista de sequências na página. Outra opção manual é utilizar Controles para iniciar a reprodução.
No entanto, durante um espetáculo com duração definida ou mesmo durante uma atuação ao vivo, poderá querer reproduzir uma sequência de cenas sem intervenção manual.
Nesses casos, existem duas opções: utilizar o Timeline módulo para agendar uma sequência de ações, ou utilizar o Piloto automático modo, uma opção de reprodução simples que pode ser facilmente ativada diretamente no Sequências módulo.
Como funciona o piloto automático?
Quando ativada, Piloto automático percorre a lista de sequências numa página, alternando a sequência reproduzida uma a uma, com base nos parâmetros que pode ajustar nas definições acessíveis a partir da barra de título do módulo:
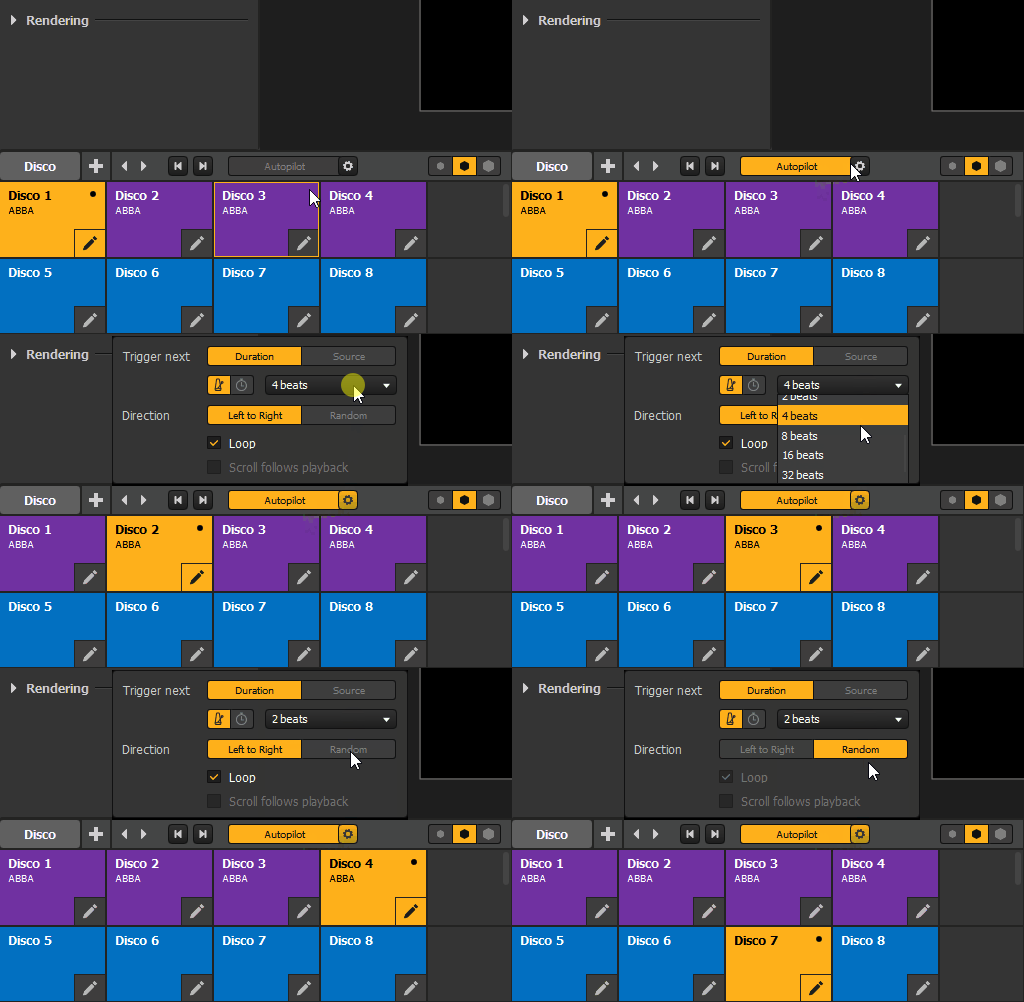
- Ativar o seguinte: Isto determina a etapa de sequenciação que Piloto automático é utilizado para passar de uma sequência para a seguinte. O mesmo atraso é aplicado a todas as mudanças de sequência. Se pretender personalizar a duração entre cada sequência, consulte o Módulo Timeline.
- Duração: Piloto automático passa para a sequência seguinte após um período fixo, medido em tempo ou batidas.
- Fonte: Piloto automático avança para a sequência seguinte quando o primeiro/último Fonte a sequência atual termine. A Fonte é considerado concluído quando o último conteúdo multimédia que contém chega ao fim pela primeira vez (independentemente do modo de repetição definido).Nota: Se não Fonte está a ser reproduzido na sequência atual, Piloto automático nunca passará para o seguinte. O mesmo se aplica se um ficheiro multimédia estiver configurado para reprodução em loop infinito no meio de uma lista de reprodução de origem, uma vez que nunca se chega ao fim do último ficheiro multimédia.
- Direção: Isto determina qual é a próxima sequência da lista (as células vazias são ignoradas).
- Da esquerda para a direita: Piloto automático reproduz as sequências na página da esquerda para a direita, linha a linha.
- Aleatório: A sequência seguinte é escolhida aleatoriamente entre as que se encontram na mesma página.
- Loop: Isto determina se Piloto automático continua a reproduzir a partir da primeira sequência após concluir todas as sequências da página ou permanece na última. (Esta opção só pode ser desativada quando se utiliza o “Da esquerda para a direita” direção.)
- A rolagem acompanha a reprodução: Quando esta opção está ativada, a rolagem ajusta-se automaticamente para manter sempre o Jogou sequência atualmente visível (se estiver na página atual). Isto também funciona se a alteração da sequência for efetuada manualmente enquanto Piloto automático está desligado.
Utilizar o Autopilot
Para ativar Piloto automático, basta ativar ou desativar o botão associado na barra de título do módulo.
Existem duas possibilidades:
- Não está a ser reproduzida nenhuma sequência quando o piloto automático está ativado: A primeira sequência (linha 1, coluna 1) da página atualmente selecionada passa a ser a sequência reproduzida, e o Autopilot irá percorrer a lista de sequências nessa mesma página.
- Já está a ser reproduzida uma sequência quando o Autopilot é ativado: A ativação é contínua; a sequência que está a ser reproduzida continua a ser reproduzida e o Autopilot limita-se a iniciar o seu temporizador a partir desse ponto. Assim que um ciclo estiver concluído, passa para a sequência seguinte na página.
Para desativar Piloto automático, basta desativar o botão.
A reprodução continuará simplesmente na mesma sequência até que a altere manualmente.
Nota: Quando Piloto automático estiver ativo, ainda é possível alterar manualmente as sequências. Neste caso, o temporizador reinicia e a reprodução continua a partir da sequência selecionada. Se selecionar uma célula vazia, Piloto automático permanecerá num ciclo no Blackout até selecionar uma nova sequência.
Planear um cronograma
O Timeline é um módulo dentro do Sequenciador que permite programar uma sequência de ações ao longo de uma linha do tempo. A reprodução e as transições entre sequências podem, assim, ser automatizadas.
A forma de onda de um ficheiro de áudio pode ser utilizada para sincronizar os gatilhos de ação com o som.

Para saber como utilizar a Linha do Tempo ou simplesmente explorar as suas funcionalidades na prática, pode consultar o artigo seguinte, que apresenta um guia passo a passo de um caso de utilização. Em alternativa, continue a ler este guia se preferir uma visão geral detalhada de todos os componentes da Linha do Tempo.
Faixas
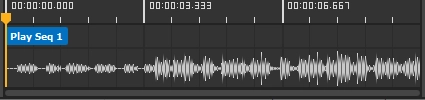
O Timeline está dividido em vários componentes. No centro encontram-se três faixas, sobrepostas umas às outras e alinhadas com a mesma linha temporal:
- Na parte superior, o registo de tempo, onde o cursor de reprodução são apresentados os movimentos e o tempo.
- No meio, o Faixa de referência, onde se encontram os rótulos das “marcações” — pequenas bandeiras que permitem programar ações automáticas quando o cursor de reprodução chega até elas. O seu funcionamento é explicado em pormenor mais adiante neste artigo.
- Na parte inferior, o faixa de áudio, onde é apresentada a forma de onda de áudio caso tenha sido importado um ficheiro de som para a Linha do Tempo.
Esta parte central do Timeline pode ser percorrido horizontalmente (utilizando a barra de deslocamento, arrastando com o botão do meio do rato ou mantendo premido [Shift] (ao percorrer verticalmente) e com a possibilidade de ampliar a imagem através de um simples deslocamento vertical ou através de botões específicos (ver a secção seguinte).
Controlos de reprodução
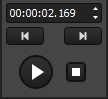
À esquerda, os controlos de reprodução permitem-lhe iniciar a reprodução ou avançar o cursor de reprodução.
O Reproduzir/Pausar O botão tem 3 estados:
Indica que a linha do tempo não está a ser reproduzida nem está em pausa: o cursor de reprodução não se move e, se for reposicionado manualmente, os marcadores por onde passa não são acionados. Se clicar no botão, a linha do tempo começa a ser reproduzida.
Indica que a linha do tempo está a ser reproduzida: o cursor de reprodução desloca-se ao longo da linha do tempo definida e aciona os marcadores por onde passa. Se clicar no botão, a linha do tempo é colocada em pausa.
Indica que a linha do tempo está em pausa: o cursor de reprodução não se move e a linha do tempo está suspensa. A opacidade global da renderização ajusta-se de acordo com a configuração definida nos parâmetros da linha do tempo (ver abaixo). Se clicar no botão, a linha do tempo começa a ser reproduzida.
Parar: Pára completamente a linha do tempo, coloca o indicador de reprodução em 00:00:00.000 e reinicia o Reproduzir/Pausar coloca o botão no estado «parado» e altera a renderização para Apagão (não está a ser reproduzida nenhuma sequência).

Indicação anterior/seguinte: Desloca o indicador de reprodução para o cue mais próximo, antes ou depois da sua posição atual. Se a linha do tempo estiver parada, o indicador de reprodução é simplesmente deslocado e permanece imóvel. Caso contrário, a reprodução é retomada e, se o cue anterior ou seguinte tiver uma ação do tipo “Reproduzir”, esta é acionada.
Posição do cursor de reprodução: Indica a posição do cursor de reprodução na faixa da linha do tempo. O cursor de reprodução pode ser movido manualmente introduzindo uma nova posição neste campo específico, arrastando-o ao longo da faixa da linha do tempo, clicando numa posição numa das três faixas ou utilizando as setas do teclado (em incrementos de 1 ms).
Barra de ferramentas
À direita, a barra de ferramentas permite aceder às ferramentas e definições da Linha do Tempo:
- Ajustar a altura: Permite ampliar ou reduzir a altura da Linha do Tempo. Pode ter um tamanho mínimo fixo, ocupar metade da altura total do Sequenciador ou ocupar toda a altura, caso o módulo Sequências esteja oculto.
- Definições:
- Duração da linha do tempo: Determina a duração de uma volta completa da linha do tempo. Quando o indicador de reprodução chega ao fim, volta ao início. Nota: Se a duração da linha do tempo for reduzida, todos os marcadores posicionados para além do novo limite máximo são deslocados para o final.
- Substituir a opacidade principal quando em pausa: Esta definição permite-lhe definir um valor temporário que substitui a opacidade de renderização global quando a linha do tempo está em pausa.
- Ficheiro de áudio e botão associado: Apresenta o nome do ficheiro de áudio importado para a Linha do Tempo (caso exista) e disponibiliza opções para o eliminar ou substituir.
- A rolagem acompanha o cursor de reprodução: Quando esta opção está ativada, a visualização ajusta-se automaticamente para manter sempre visível o indicador de reprodução.
- Adicionar uma marca: Permite-lhe adicionar um marcador na posição do indicador de reprodução, selecionando uma ação no menu suspenso. As ações são descritas em pormenor numa secção seguinte.
- Adicionar um ficheiro de áudio: Permite-lhe selecionar um ficheiro de áudio do seu computador. O ficheiro será adicionado à linha do tempo com a sua forma de onda, a partir de 00:00:00.000.
- Zoom: Permite ampliar ou reduzir a Linha do Tempo. O zoom mínimo é atingido quando toda a extensão da Linha do Tempo cabe na vista. Também é possível utilizar a roda do rato para ampliar ou reduzir.
Utilizar sinais para programar ações
O que é um «cue»?
Um cue é um objeto na Linha do Tempo que envia um sinal de ativação para uma ação relacionada com a reprodução da sequência. Aparece como uma pequena bandeira posicionada num momento específico no Timeline e é ativado quando o indicador de reprodução atinge essa posição durante a reprodução.
Adicionar uma marca
Existem várias formas de adicionar um marcador. Pode:
- Arraste uma sequência diretamente para a faixa de Cue para adicionar um “Jogar” sinal associado a um momento específico.
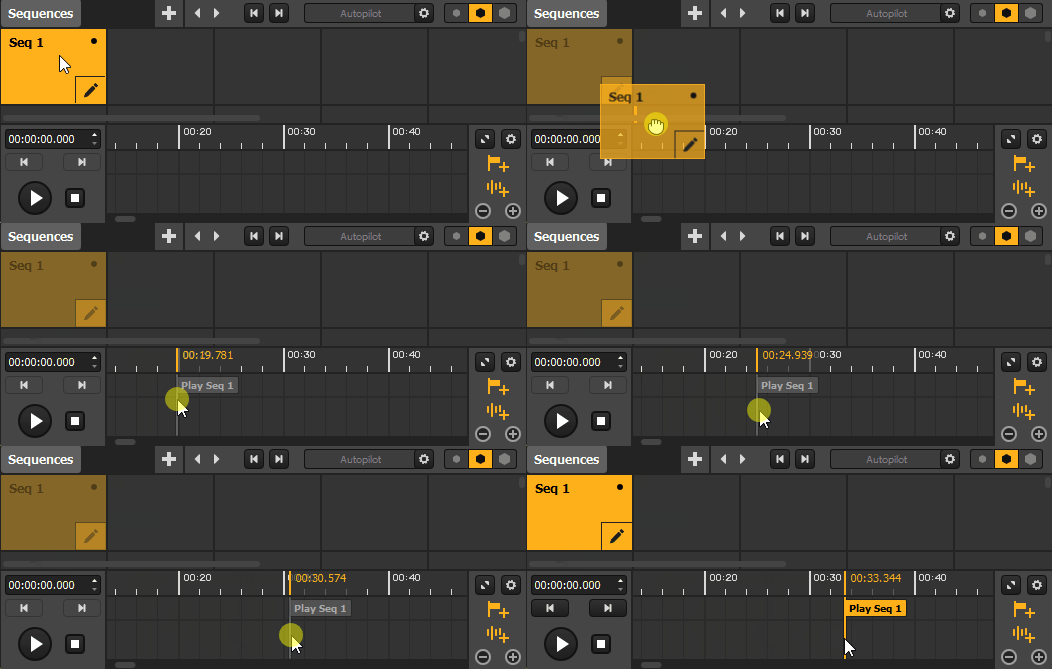
- Utilize o botão correspondente na barra de ferramentas da Linha do Tempo, que dá acesso a todas as ações disponíveis e permite colocar um marcador na posição do indicador de reprodução.
- Clique com o botão direito do rato na faixa de Cue e escolha uma ação para adicionar uma indicação específica num momento preciso.
- Clique duas vezes na faixa de Cue para adicionar um “Nenhum” marca, que serve apenas como um indicador num momento específico.
- Copiar/Cortar/Colar uma marca existente, selecionando-a e utilizando o menu do botão direito do rato ou os atalhos de teclado habituais. As cópias são colocadas na posição do indicador de reprodução.
Escolher uma bola de jogo
Quando se adiciona um cue, este é selecionado automaticamente. Caso contrário, basta clicar no rótulo de um cue para o selecionar ou clicar num espaço vazio na faixa de áudio ou na faixa de cues para o desmarcar.
Nota: Só é possível selecionar um taco de cada vez.
Editar um Cue
Quando um cue é selecionado, as suas definições aparecem no painel dedicado à direita. Aqui está uma lista dos parâmetros do cue e das ações possíveis:
- Nome: O nome do taco, indicado na sua etiqueta.
- Cor: A cor do taco no Timeline (7 opções disponíveis).
- Data e hora: A posição do cue na linha do tempo. Se vários cues partilharem exatamente a mesma posição, apenas um será acionado.
- Ação:
- Reproduzir: Um menu suspenso que permite aceder à lista de sequências existentes e um “Blackout” opção. A “Jogar” Esta ação inicia a reprodução da sequência selecionada, como se tivesse clicado nela no módulo «Sequências», tornando-a a sequência ativa. Esta ação não afeta o progresso do indicador de reprodução.Nota: Se o “Blackout” Se esta opção estiver selecionada, a ação equivale a clicar numa célula vazia no módulo «Sequências» (não é reproduzida nenhuma sequência).
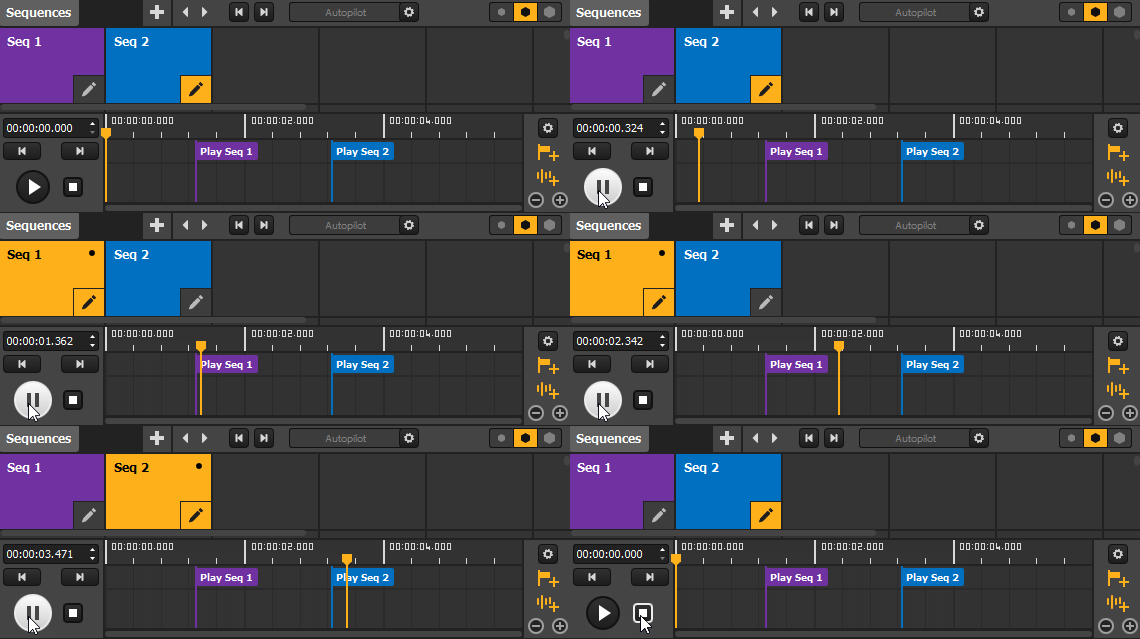
- Pausa: Pára o cursor de reprodução na posição do ponto de referência e coloca a Linha do Tempo em pausa. A renderização da sequência atual (ou o ecrã preto) não é interrompida, mas é possível definir um valor temporário de opacidade global da renderização nas definições da Linha do Tempo.
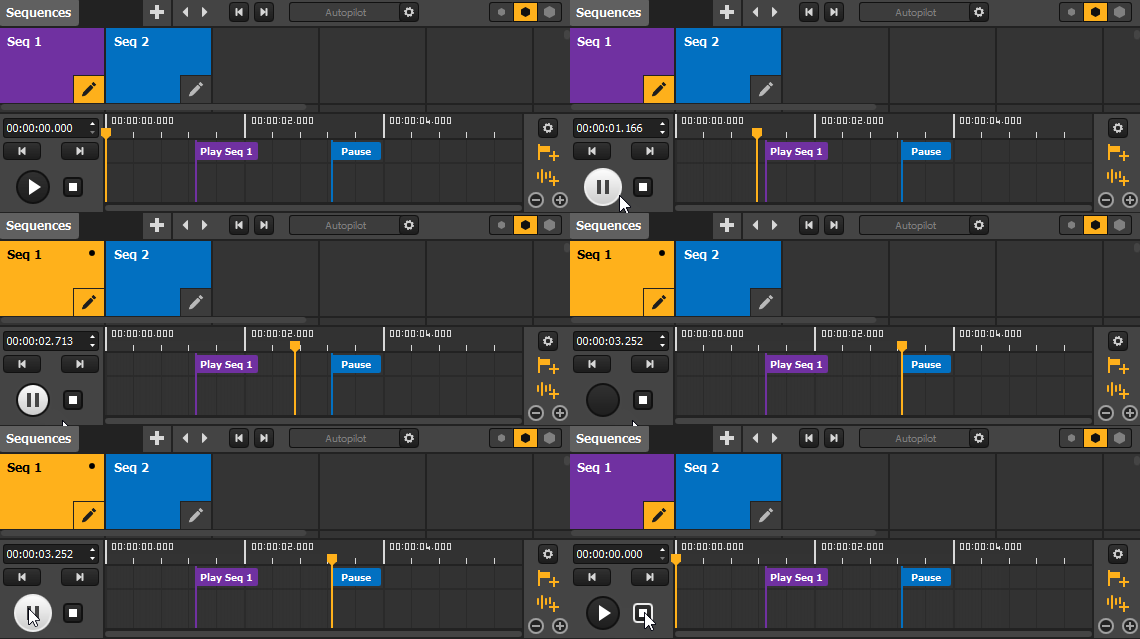
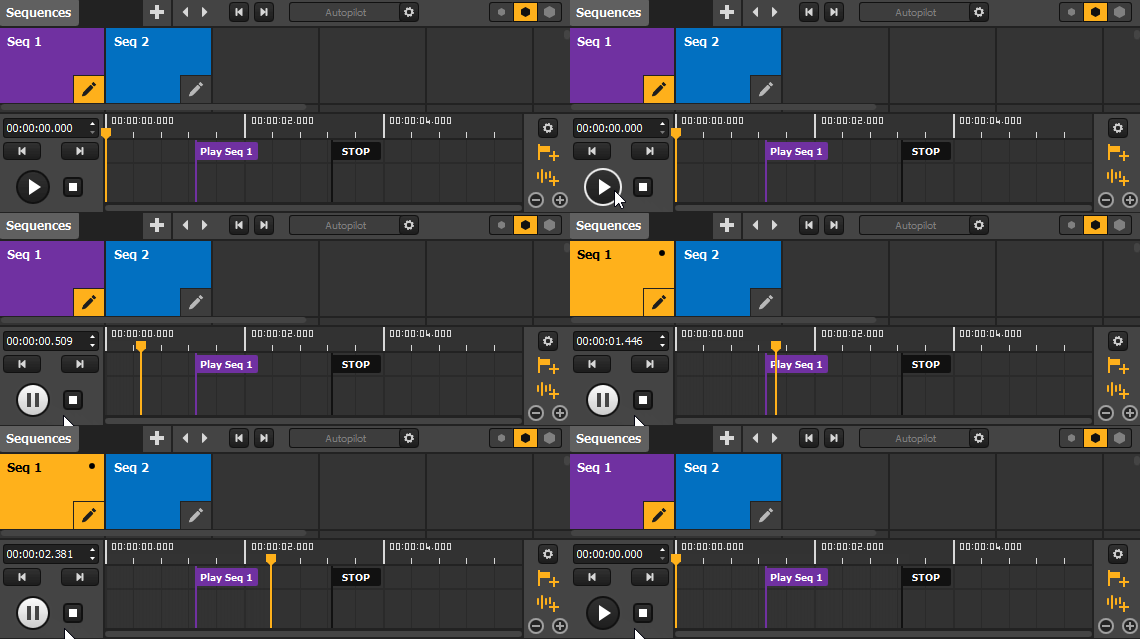
- Pára: Pára o cursor de reprodução e reposiciona-o em 00:00:00.000. A linha do tempo entra no estado de paragem e a renderização passa para «Blackout» (não é reproduzida nenhuma sequência).
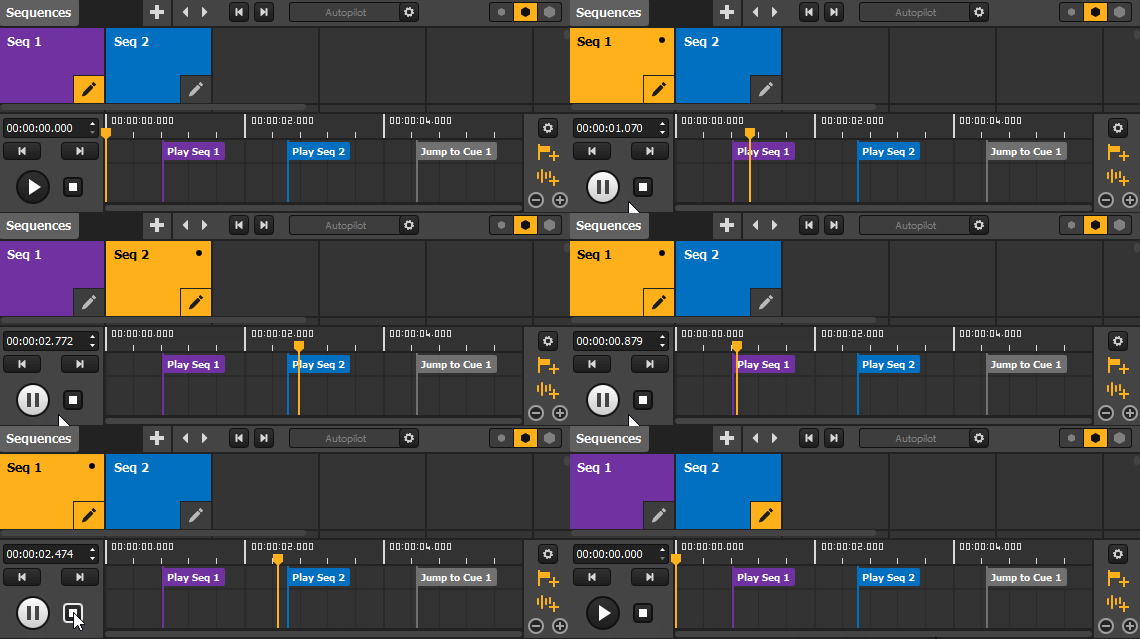
- Ir para: Um menu suspenso que permite aceder à lista de sinais existentes e um “Iniciar” opção. A “Ir para” Esta ação permite-lhe saltar diretamente para o ponto de referência selecionado, como se tivesse clicado duas vezes nele. Esta ação desloca o indicador de reprodução, que passa então a avançar a partir desse ponto (o “Iniciar” (esta opção refere-se à posição 00:00:00.000).
- Nota: Se o cue de destino acionado pelo salto tiver uma ação “Reproduzir”, essa ação também será executada.
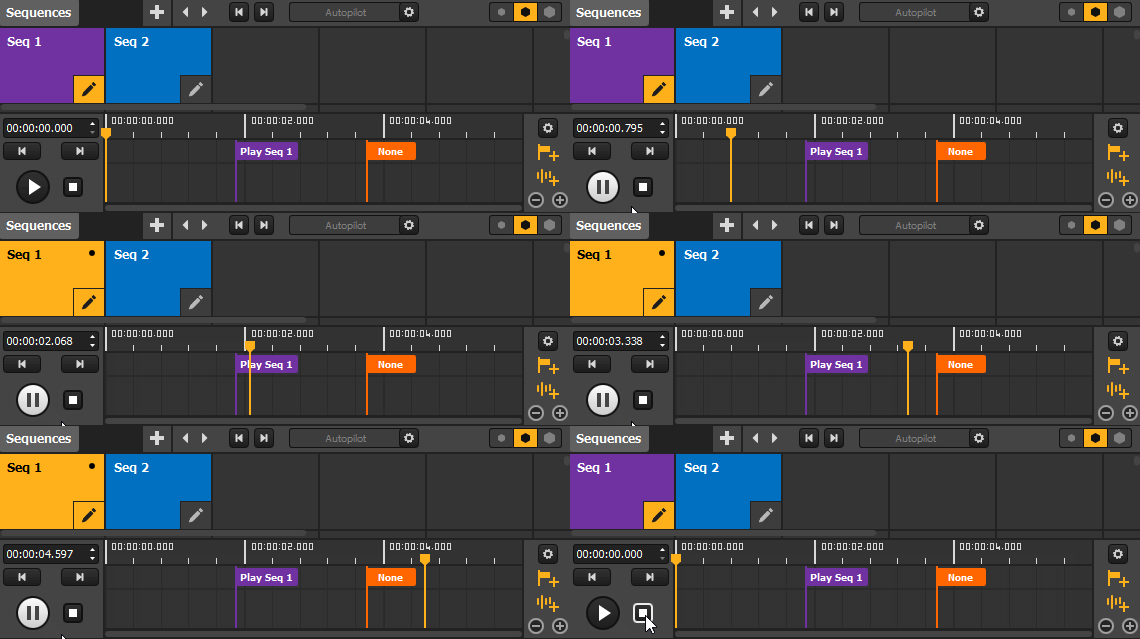
- Nenhum: Não desencadeia qualquer ação e não afeta o avanço do cursor de reprodução; pode servir simplesmente como referência.
Nota: Se um objeto alvo de uma ação de indicação for eliminado, a indicação passa automaticamente a ser um marcador simples até que o objeto seja restaurado ou a ação seja alterada manualmente.
Eliminar um Cue
Para eliminar uma marca, basta clicar no respetivo rótulo e utilizar [Apagar/Backspace] ou Clique com o botão direito do rato -> Apagar.
Exportar para um ficheiro de vídeo
A funcionalidade de exportação de vídeo permite-lhe renderizar um projeto como um único ficheiro de vídeo. Este artigo fornece informações sobre como realizar a exportação e o que esperar.
Como exportar um projeto como vídeo
Para exportar um projeto como um ficheiro de vídeo, utilize o menu Ficheiro → Exportar como vídeo…. Aparecerá uma janela informativa a pedir-lhe que confirme o início do processo de renderização.
Assim que a exportação começar, será informado sobre o seu andamento, tal como se pode ver na imagem abaixo (a percentagem apresentada corresponde ao andamento da renderização da sequência atual).
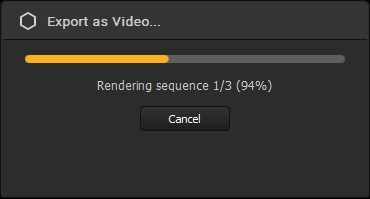
Quando a renderização estiver concluída, uma nova janela irá notificá-lo e dar-lhe acesso à pasta onde se encontra o ficheiro de vídeo. Todas as exportações são guardadas na mesma pasta:
- “Documentos/HeavyM/Exportação” no Windows.
- “Utilizador/Biblioteca/Apoio a Aplicações/HeavyM/Export” no Mac.
Nota: Pode cancelar a exportação a qualquer momento a partir da janela de progresso. Ao clicar no “Cancelar” O botão interrompe a exportação e elimina o ficheiro de vídeo incompleto.
O que é que é exportado, exatamente?
Eis alguns pontos-chave sobre o conteúdo do ficheiro de vídeo:
- Toda a saída da tela é gravada como uma única parte. Certifique-se de que a largura e a altura da tela não são números ímpares, pois isso pode fazer com que a exportação falhe.
- Toda a linha do tempo é exportada, mas apenas “Jogar” os indícios são tidos em conta, o que significa que as ações das instruções “Pausa”, “Parar” e “Saltar para” são ignoradas.
- Se não houver um sinal de “Reproduzir” no início da linha do tempo, é apresentado um ecrã preto na exportação até que um sinal de “Reproduzir” acione uma sequência, como se tivesse sido colocado um sinal de “Reproduzir – Apagão” às 00:00. Isto garante que os tempos são preservados e que a duração da exportação corresponde sempre à extensão da linha do tempo.
- Os modos “Reprodução” e “Repetição” das fontes são respeitados. Se uma fonte estiver configurada para reiniciar quando uma sequência específica for reproduzida (com o “Reiniciar com seq” (opção), isso irá ocorrer na exportação.
- Se o projeto incluir transmissões “ao vivo” (NDI, webcam, etc.) em determinadas sequências, a exportação regista o que é enviado para o software no momento em que essas sequências são renderizadas.
- O áudio da linha do tempo está incluído na exportação.
Quais são as definições de exportação de ficheiros?
O ficheiro de vídeo resultante apresenta as seguintes características:
- Resolução: Corresponde à resolução da tela.
- Duração: Corresponde à duração da linha do tempo.
- Formato: .mov
- Codec: H264
- Taxa de fotogramas: 30 FPS
- Taxa de bits: Ajustado com base na resolução do Canvas para manter uma taxa de bits constante por pixel.
- Áudio: Se houver um ficheiro de áudio na linha do tempo, este é incluído na exportação.
Para continuar
Este guia foi escrito por HeavyM, uma empresa especializada em video mapping desde 2013.
Para quaisquer perguntas, comentários, sugestões, etc., utilize este formulário de contacto: https://help.heavym.net/hc/requests/new. Resposta garantida no prazo de 24 horas.
Perguntas frequentes (FAQ)
Como é que me preparo para um espetáculo de projeção mapping ao vivo?
Para garantir uma apresentação ao vivo impecável, deve otimizar o desempenho do seu computador. Feche sempre as aplicações em segundo plano, organize todos os seus ficheiros multimédia numa única pasta dedicada e teste as saídas do projetor e Controladores MIDI antes da chegada do público.
Posso gravar ou exportar o meu projeto de video mapping?
Sim. Se quiseres apresentar o teu trabalho online ou enviá-lo a um cliente, um software de projeção de mapping como HeavyM permite-lhe exportar toda a sua tela digital diretamente para um ficheiro de vídeo de alta qualidade, evitando a necessidade de gravar a projeção física com uma câmara.
Qual é o melhor formato de vídeo para exportar um projeto de mapeamento?
Se pretender exportar o seu projeto para partilhar nas redes sociais ou no YouTube, o codec H.264 (formato MP4) é a melhor opção para obter um excelente equilíbrio entre qualidade e tamanho do ficheiro. Para arquivo profissional, utilize um formato sem perdas, como o Apple ProRes.