

Live-Interaktion mit einem video mapping
Fotokartierung: Mapping https://limbiccinema.com/portfolio-item/the-temple/
TL;DR
Durch die Live-Interaktion mit video mapping können Darsteller visuelle Effekte in Echtzeit steuern. Mithilfe von MIDI-Controllern, OSC-Protokollen oder Computertastaturen können Sie Formen und Farben während einer Show sofort beeinflussen. HeavyM vereinfacht diesen Vorgang durch native Plug-and-Play-Unterstützung, sodass Sie mühelos und ganz ohne Programmieraufwand Live-Visuals präsentieren können.
Mit der Tastatur
Wusstest du, dass Ist es möglich, HeavyM nicht nur mit der Maus oder dem Touchpad zu steuern? Denn seien wir ehrlich: Diese Werkzeuge sind zwar sehr praktisch, um am Schreibtisch zu zeichnen und Einstellungen anzupassen, aber während einer Live-Performance durch die Bedienfelder zu scrollen, um eine kleine Effekt-Schaltfläche zu finden, macht nicht gerade Spaß. Deshalb kannst du Erleichtern Sie sich das Leben mit externen Bedienelementen und nutzen Sie beispielsweise eine Tastatur.
Standard-Tastenkombinationen
Um die Bedienung zu vereinfachen und die Anzahl der Klicks zu reduzieren, die für den Zugriff auf bestimmte Funktionen erforderlich sind, sind in der Software bereits einige Tastenkombinationen integriert. Die aktualisierte Liste der Tastenkombinationen für Ihre Version können Sie direkt in der Software über das Menü aufrufen. Steuerung → Liste der Tastaturkürzel… oder über die Tastenkombination [Strg/Cmd + /].
Benutzerdefinierte Tastenkombinationen
Zusätzlich zu diesen Standard-Tastenkombinationen können Sie auch eigene Tastaturbefehle für HeavyM festlegen. Dazu müssen Sie der Benutzeroberfläche der Anwendung “beibringen”, auf welche Taste sie reagieren soll.
Tastatur-Lernmodus aktivieren
Um Tasten zuzuweisen, müssen Sie zunächst die Oberfläche „Tastaturbelegung“ aktivieren. Aktivieren Sie diese über das Menü:
Steuerung → MIDI-Zuweisungen bearbeiten, oder gehen Sie auf die Tastatur Registerkarte in der Steuerungen Einstellungsfenster (aufrufbar über Steuerung → Einstellungen… oder das Symbol)
(in der Symbolleiste) und klicken Sie auf die “Lernmodus für die Tastatur” Schaltfläche. Auf vielen Elementen der HeavyM-Benutzeroberfläche erscheint ein Farbfilter.
Mit MIDI
MIDI steht für “Musical Instrument Digital Interface.” Es handelt sich um ein Protokoll, das für die Kommunikation zwischen elektronischen Instrumenten und anderen digitalen Musikgeräten verwendet wird.
Sie können ein MIDI-Instrument so konfigurieren, dass es Befehle an den HeavyM sendet. Kurz gesagt ermöglicht dieses Protokoll die Fernsteuerung der Funktionen des HeavyM über einen Controller, der – in der Regel über USB – an Ihren Computer angeschlossen ist.
Da a MIDI-Controller Da es in der Regel verschiedene Arten von Bedienelementen umfasst, bietet es mehr Möglichkeiten als eine Tastatur. Einmal eingerichtet, müssen Sie Ihren Computer gar nicht mehr berühren!
Anschließen eines MIDI-Geräts
Sobald Sie Ihren MIDI-Controller an Ihren Computer angeschlossen haben, gehen Sie zu der MIDI Registerkarte im Fenster „Steuerungseinstellungen“ (aufrufbar über Steuerung → Einstellungen… oder das Symbol:
(in der Symbolleiste) und wählen Sie Ihr Gerät aus der Dropdown-Liste “Gerät” aus.
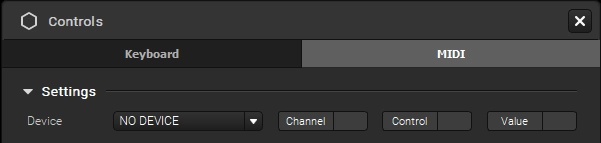
Wenn Ihr Gerät korrekt erkannt wird, werden Werte in der Kanal/Steuerung/Wert Felder, wenn Sie eine Taste drücken oder einen Fader bewegen. Wenn keine Reaktion erfolgt, kann dies bedeuten, dass das Gerät bereits mit einer anderen Anwendung verbunden ist. Tatsächlich ist es nicht möglich, dasselbe Gerät gleichzeitig in mehreren Programmen zu verwenden.
Hinweis: Derzeit können Sie in HeavyM jeweils nur ein MIDI-Instrument anschließen.
Aufträge verwalten
MIDI-Lernmodus aktivieren
Sobald Ihr Controller eingerichtet ist, können Sie Tasten, Fader, Pads oder andere Bedienelemente des Controllers den HeavyM-Befehlen zuweisen. Dazu müssen Sie der Benutzeroberfläche der Anwendung “beibringen”, auf welches MIDI-Element sie reagieren soll.
Um die MIDI-Lernfunktion zu aktivieren, verwenden Sie die “MIDI-Lernmodus” Schaltfläche im Fenster „Steuerelemente“ oder über das Menü (Steuerung → MIDI-Zuweisungen bearbeiten). Auf der Benutzeroberfläche erscheint ein Farbfilter, der die Schaltflächen hervorhebt, die belegt werden können.
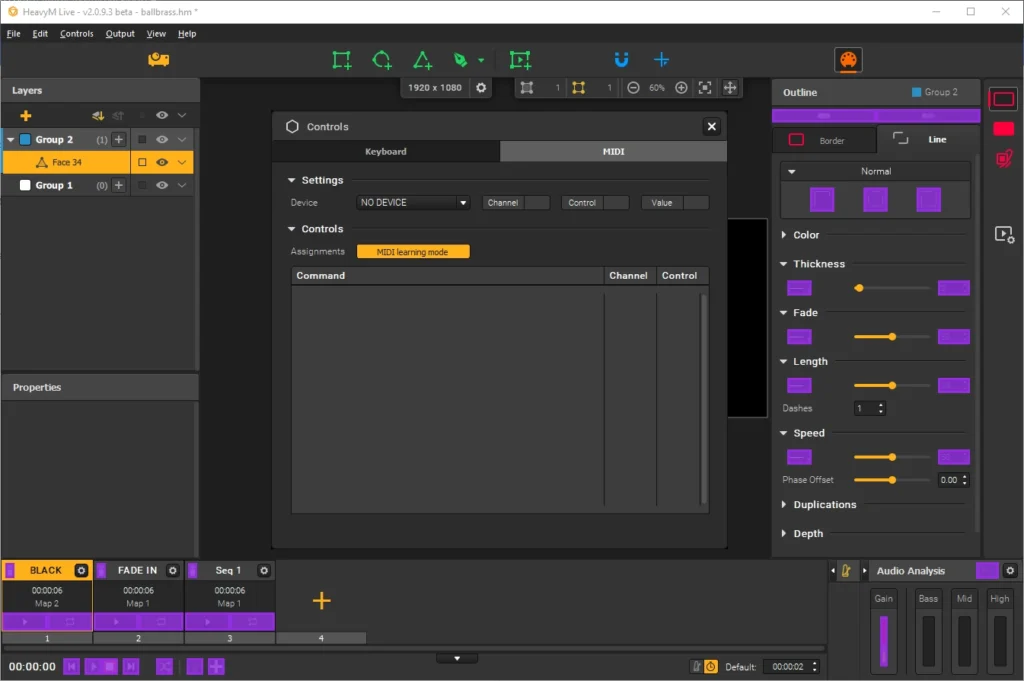
Aufgaben hinzufügen
Wählen Sie eine Schaltfläche oder einen Schieberegler aus, indem Sie darauf klicken (es wird gelb hervorgehoben), dann verschieben Sie einfach das Steuerelement Ihres MIDI-Geräts, das Sie verwenden möchten, oder klicken Sie darauf. Dadurch werden die beiden Elemente miteinander verknüpft, und die Verbindung wird in der Liste im Einstellungsfenster „Steuerelemente“ angezeigt.
Sobald Sie fertig sind, können Sie den Lernmodus über dieselbe Schaltfläche/dasselbe Menü oder durch Drücken von [Esc].
Wenn Ihr Controller MIDI-Out unterstützt, zeigen die zugewiesenen LED-Tasten den Status der jeweils zugehörigen Aktion in der Software an. Bei kompatiblen Controllern leuchten die Tasten beispielsweise in der Farbe der ihnen in HeavyM zugewiesenen Sequenz, oder – falls ein Umschalter zugewiesen ist – leuchtet die Taste auf, wenn dieser auf „ON“ steht.
Mit OSC
Was ist OSC?
OSC steht für “Open Sound Control.” Es handelt sich um ein Protokoll, das für die Kommunikation zwischen Multimedia-Geräten verwendet wird, ähnlich wie das MIDI-Protokoll, Es ermöglicht jedoch eine höhere Datenübertragungsrate, schnellere Geschwindigkeiten und funktioniert über Netzwerke wie WLAN oder Ethernet. Kurz gesagt: Mit diesem Protokoll können Sie die Funktionen von HeavyM aus der Ferne steuern, beispielsweise über ein Smartphone. Das Gute daran ist, dass keine langen Kabel erforderlich sind — Ihre Geräte müssen lediglich im selben Netzwerk sein.
Dies eröffnet unendliche Möglichkeiten für interaktive Installationen!
Wir werden in erster Linie Anleitungen für Verwendung mit einer iOS- oder Android-App, dank Tools, die eine einfache und schnelle Einrichtung ermöglichen. Beachten Sie jedoch, dass viele weitere OSC-Verbindungen möglich sind: Das Protokoll ermöglicht beispielsweise auch die Verwendung von Timeline-basierter Automationssoftware wie Vezér oder das Leiterwerkzeug Chataigne.
TouchOSC und HeavyM verbinden
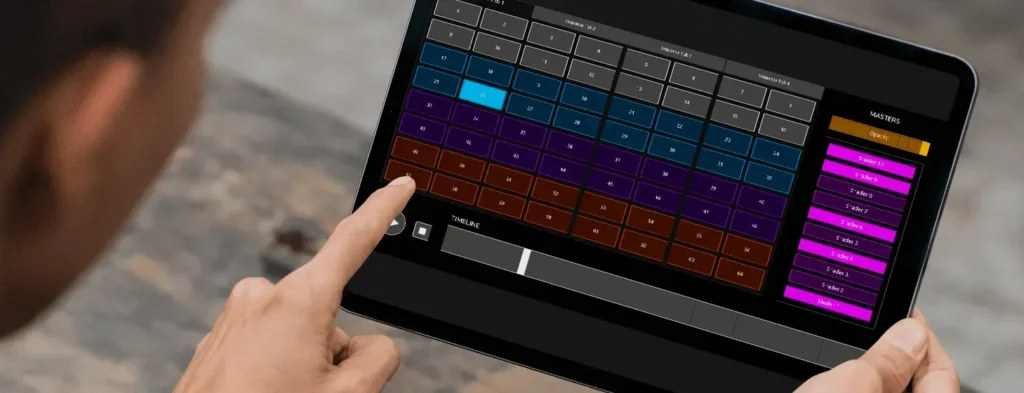
Die folgenden Absätze enthalten konkrete Anweisungen, die Ihnen beim Anschließen des TouchOSC App mit HeavyM. (Wir werden von dieser App nicht gesponsert, das versprechen wir.)
Um diese Anleitung befolgen zu können, benötigen Sie HeavyM, TouchOSC und ein fertiges Layout. Falls Sie eine andere Anwendung verwenden, kann Ihnen diese Anleitung dennoch weiterhelfen, da es viele Ähnlichkeiten gibt. Andernfalls lesen Sie bitte das Handbuch Ihrer Anwendung.
Hinweis: Ihre Geräte müssen mit demselben Netzwerk verbunden sein, um miteinander zu kommunizieren, müssen jedoch nicht unbedingt drahtlos verbunden sein: Ihr Smartphone kann beispielsweise eine WLAN-Verbindung nutzen, während Ihr Computer über Ethernet verbunden ist.
In TouchOSC
Hinweis: Diese Anleitung beschreibt die Vorgehensweise für die iOS-Version der App. Die Benutzeroberfläche unter Android unterscheidet sich geringfügig, die Schritte sind jedoch ähnlich, sofern nicht anders angegeben.
- Öffnen Sie zunächst die “Verbindungen” Rufen Sie die Einstellungen über die Schaltfläche mit dem Kettenglied-Symbol in der Symbolleiste auf und wechseln Sie zu der “OSC” Registerkarte.
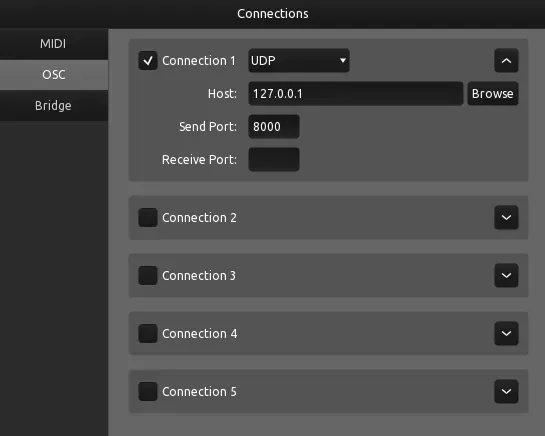
- In der “Gastgeber” Feld des ersten “Verbindung”, geben Sie die IP-Adresse Ihres Computers ein. Diese finden Sie in der Regel unter Einstellungen oder Systemeinstellungen, unter Network Eigenschaften.
- In der “Send Port” und “Empfangsport” Geben Sie in die Felder beliebige (unterschiedliche) Zahlen zwischen 7.000 und 10.000 ein.
- Lassen Sie diesen Reiter geöffnet, da Sie einige Informationen kopieren müssen, und wechseln Sie anschließend zu HeavyM.
In HeavyM
- Öffnen Sie die Steuerungen Einstellungsfenster aus Steuerelemente → Einstellungen für Steuerelemente… oder das Symbol
und wechseln Sie zur Registerkarte “OSC”. Stellen Sie sicher, dass „OSC Control“ EIN über die Schaltfläche oben im Fenster.
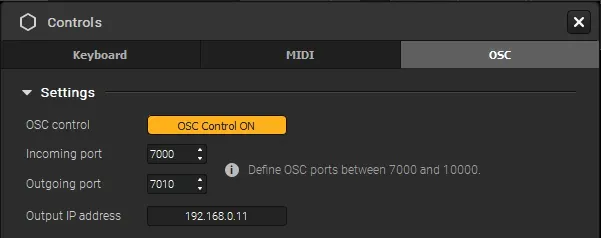
- Als Nächstes im “Ankunftshafen” Feld die Nummer ein, die in der “Send Port” Bereich von TouchOSC. Umgekehrt gilt im “Ausgehender Port” Feld die in der “Empfangsport” Bereich von TouchOSC.
- In der “Ausgabe-IP-Adresse” Geben Sie in das Feld die IP-Adresse Ihres Smartphones oder Tablets ein. Diese finden Sie in der Regel in den Einstellungen Ihres Geräts. Network Einstellungen, oder manche OSC-Apps zeigen es dir direkt an.
Kehren Sie nun zu Ihrem Layout zurück und folgen Sie dem nächsten Abschnitt dieser Anleitung, um zu erfahren, wie Sie Layout-Elemente mit HeavyM-Befehlen verknüpfen können.
Hinweis: Sollten Sie nach Befolgen dieser Anweisungen auf Schwierigkeiten stoßen, können Sie die TouchOSC-Dokumentation auf ihrer Website (auf Englisch). Die Anleitung ist recht ausführlich und behandelt auch die Vorgehensweise für iOS-Geräte sowie weitere erweiterte Funktionen der App.
Aufträge verwalten
Verwendung der OSC-API von HeavyM
Zusätzlich zur Vergabe eigener OSC-Adressen mit Lernmodus, können Siedie Standard-OSC-Adressen bereits in HeavyM integriert.
Jedes zuweisbare Element der Schnittstelle ist mindestens einer Adresse zugeordnet. Verfügt es über mehr als eine Adresse, bedeutet dies, dass dasselbe Ergebnis auf verschiedene Arten erreicht werden kann. Zum Beispiel:, Wenn Sie eine Sequenz bearbeiten möchten, können Sie sie über ihren Namen oder ihre Position aufrufen., was bedeutet, dass es zwei Adressen für dieselbe Aktion gibt.
In diesem Fall erfolgt die gesamte Konfiguration der Zuordnung direkt in Ihrer OSC-sendenden Anwendung; HeavyM muss nicht einmal geöffnet sein.
Aufgaben mit OSC Learning hinzufügen
Sobald die Verbindung hergestellt ist, können Sie Tasten, Fader, Pads oder andere in Ihrem Layout enthaltene Bedienelemente den HeavyM-Befehlen zuweisen. Dazu müssen Sie der Software-Schnittstelle “beibringen”, auf welches OSC-Element Ihres Layouts sie reagieren soll.
Um die OSC-Lernoberfläche zu aktivieren, verwenden Sie die “OSC-Lernmodus” Schaltfläche im Fenster „Steuerelemente“ oder über das Menü (Steuerung → OSC-Zuweisungen bearbeiten). Auf der Benutzeroberfläche erscheint ein Farbfilter, der die Schaltflächen hervorhebt, die belegt werden können.
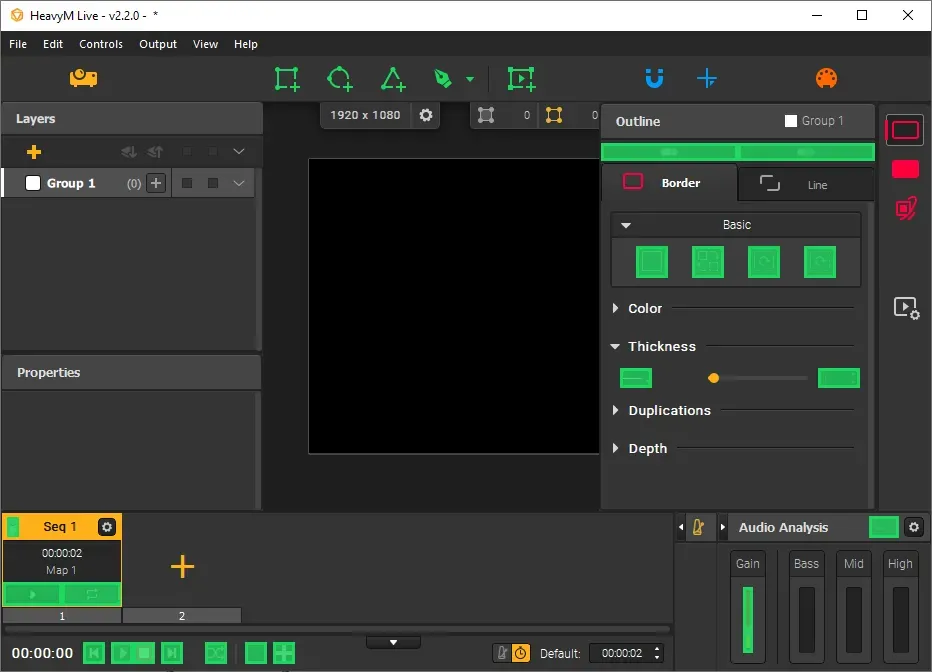
Wählen Sie eine Schaltfläche oder einen Schieberegler aus, indem Sie darauf klicken (das Element wird dann gelb hervorgehoben), und verschieben Sie anschließend das Steuerelement in Ihrem Layout an die gewünschte Stelle oder klicken Sie darauf. Dadurch werden die beiden Elemente miteinander verknüpft, und die Verbindung wird in der Liste im Fenster „Steuerelemente“ angezeigt.
Sobald Sie fertig sind, können Sie den Lernmodus über dieselbe Schaltfläche bzw. dasselbe Menü oder durch Drücken von [Esc].
Hinweis: Sie können ein und dasselbe OSC-Steuerelement gleichzeitig mehreren Befehlen zuweisen. So kann beispielsweise eine einzelne Taste auf Ihrem Gerät mit mehreren Effekt-Schaltern verknüpft werden, was bedeutet, dass beim Drücken dieser Taste alle diese Effekte gleichzeitig aktiviert werden!
⚠️ Wenn Sie eigene Vorlagen und Nachrichten erstellen, beachten Sie bitte, dass HeavyM reagiert auf “Float”-Argumente zwischen 0,0 und 1,0 in OSC. Bei Schiebereglern steht 0,0 für den Minimalwert und 1,0 für den Maximalwert. Bei Schaltern entspricht 0,0 der Stellung „AUS“ und 1,0 der Stellung „EIN“.
Mit DMX / Art-Net
DMX ist ein im Bühnen-Design weit verbreiteter Standard für die Kommunikation zwischen Steuerungen (wie Software oder Lichtkonsolen) und Leuchten oder anderen Spezialeffekten auf der Bühne.
HeavyM unterstützt die Steuerung über DMX-Eingang, und zwar über das Art-Net-Protokoll. Das bedeutet, dass Sie über eine Lichtkonsole Befehle über das Netzwerk an HeavyM senden können.
Einrichten einer Art-Net-Verbindung
Gehen Sie zunächst zur DMX / Art-Net Registerkarte im Fenster „Steuerungseinstellungen“ (aufrufbar über Steuerung → Einstellungen… oder das Symbol in der Symbolleiste).
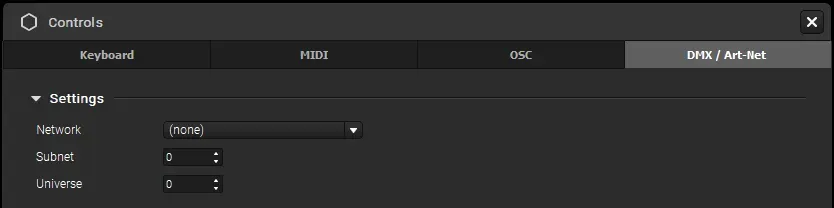
Sie müssen drei Dinge konfigurieren:
- Network: Da Art-Net Nachrichten über das Netzwerk überträgt, müssen HeavyM und Ihr DMX-Sender dieselbe Verbindung nutzen (z. B. WLAN, Ethernet oder Loopback auf demselben Computer).
- Subnetz und Universum: Legen Sie fest, auf welches Subnetz und welches Universum HeavyM hören soll, damit es mit Ihrem DMX-Sender übereinstimmt (Standardwert ist 0:0).
Aufträge verwalten
Art-Net Learning aktivieren
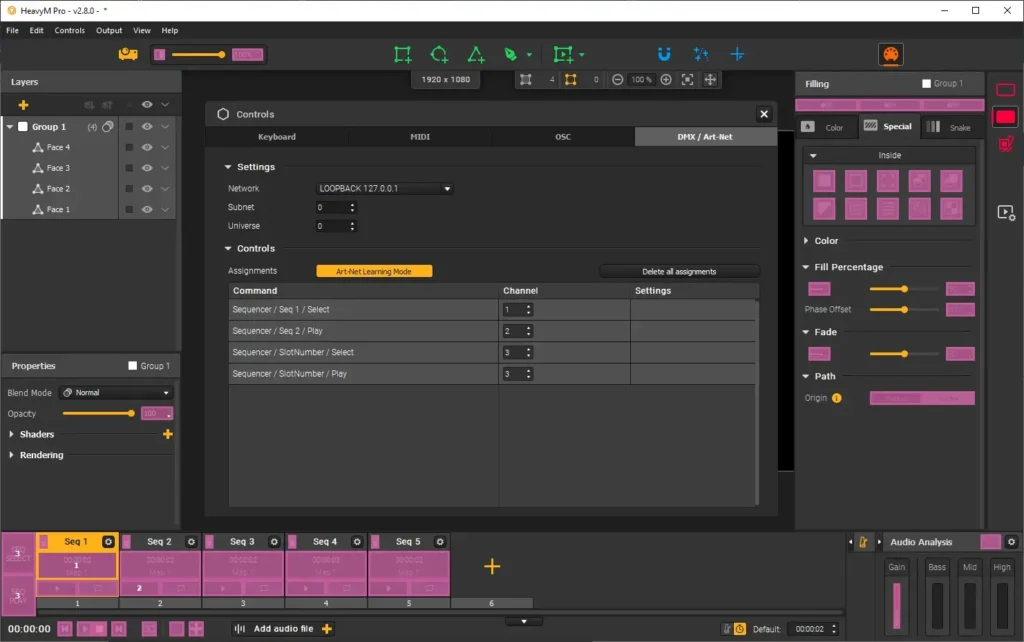
Sobald Ihre Verbindung hergestellt ist, Sie können Tasten, Fader oder andere Elemente Ihres DMX-Controllers den Befehlen in HeavyM zuweisen. Dazu müssen Sie der Anwendung beibringen, auf welches DMX-Schnittstellenelement sie reagieren soll.
Um die Art-Net Learning-Schnittstelle zu aktivieren, verwenden Sie die “Art-Net-Lernmodus” Schaltfläche im Fenster „Steuerelemente“ oder über das Menü (Steuerung → DMX-Zuweisungen bearbeiten). Auf der Benutzeroberfläche erscheint ein Farbfilter, der die Schaltflächen hervorhebt, die belegt werden können.
Weiter
Vorbereitung Ihrer Sendung oder Export Ihres Projekts
Dieser Leitfaden wurde verfasst von HeavyM, ein Unternehmen, das sich seit 2013 auf video mapping spezialisiert hat.
Bei Fragen, Anmerkungen, Vorschlägen usw. nutzen Sie bitte dieses Kontaktformular: https://help.heavym.net/hc/requests/new. Eine Antwort wird innerhalb von 24 Stunden garantiert.
Häufig gestellte Fragen (FAQ)
Wie kann ich projection mapping live steuern?
Sie können das projection mapping live über externe Hardware wie MIDI-Controller, normale Computertastaturen oder OSC-Protokolle (Open Sound Control) via Smartphones und Tablets steuern. Mit diesen Tools können Sie Effekte auslösen und Parameter in Echtzeit ändern.
Wozu wird MIDI beim video mapping verwendet?
Mit MIDI lassen sich bestimmte Softwarefunktionen – wie das Auslösen eines Stroboskopeffekts, das Ändern einer Farbe oder das Anpassen der Deckkraft – den physischen Tasten, Drehreglern und Schiebereglern eines Hardware-Controllers zuweisen. Dadurch erhalten VJs während einer Live-Performance eine taktile und unmittelbare Kontrolle über ihre Visuals.
Unterstützt HeavyM Live-Interaktion und MIDI?
Ja, HeavyM wurde speziell für Live-Performances entwickelt. Es bietet native Plug-and-Play-Unterstützung für MIDI und OSC, sodass Sie Ihre externen Controller innerhalb von Sekunden ganz einfach auf die Benutzeroberfläche der Software abbilden können, ohne komplexen Code schreiben zu müssen.