

Verwaltung der Reaktivität auf Geräusche und Musik
TL;DR
Dank der Musikreaktivität können Ihre projection mapping visuals in Echtzeit auf Tonfrequenzen reagieren. Durch die Analyse von Audioeingängen wie einem Mikrofon oder einem Line-In-Kabel wandelt die projection mapping software Beats in dynamische Animationen um. HeavyM verfügt über eine integrierte Audioanalyse, mit der Sie atemberaubende, auf Ton reagierende Shows erstellen können – ganz ohne komplexe Programmierung oder Plugins von Drittanbietern.
Einige musikalische Konzepte
BPM und Downbeats
Musik setzt sich aus verschiedenen Elementen zusammen, wobei Der Rhythmus spielt eine entscheidende Rolle bei der Bestimmung der Bewegung und des Flusses einer Komposition. Eine grundlegende rhythmische Struktur in der Musik ist BPM, oder “Beats pro Minute.” Damit wird das Tempo oder die Geschwindigkeit eines Songs gemessen. Ein Song mit 60 BPM hat beispielsweise einen Schlag pro Sekunde, während ein Song mit 120 BPM zwei Schläge pro Sekunde hat. Je höher die BPM, desto schneller ist die Musik.
Downbeats sind ein weiterer wichtiger Bestandteil des Rhythmus. Sie beziehen sich in der Regel auf den ersten Schlag eines Takts und werden in der westlichen Musik oft besonders hervorgehoben. In einer 4/4-Taktart (vier Schläge pro Takt) ist beispielsweise der erste Schlag der Downbeat. Musiker und Tänzer nutzen diese Downbeats als Orientierung, um ihr Spiel bzw. ihren Tanz zu strukturieren.
Es gibt auch positive Aspekte, Das sind die Taktschläge, die nicht betont werden. In einer 4/4-Taktart gelten der zweite und der vierte Taktschlag in der Regel als Voranschläge. Rhythmus und rhythmische Struktur sind entscheidend dafür, der Musik ihr Gefühl von Bewegung und Dynamik zu verleihen.
Frequenzen
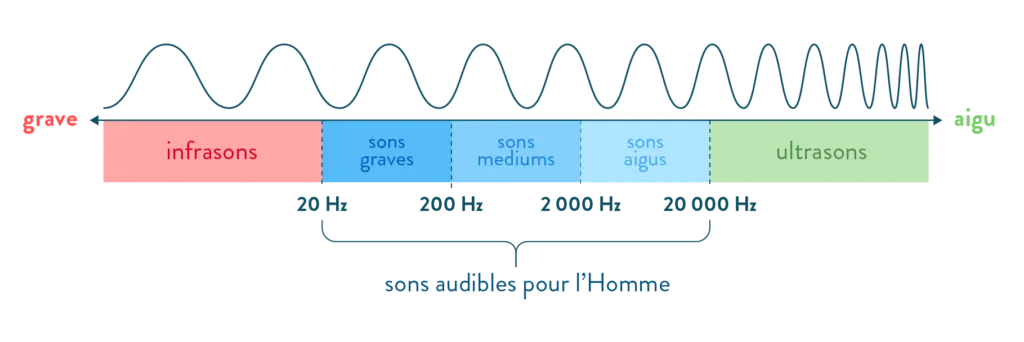
Das Klangspektrum in der Musik wird im Allgemeinen in drei Hauptfrequenzbereiche unterteilt: Bässe, Mitten und Höhen. Jeder Frequenzbereich hat einen ganz eigenen Einfluss darauf, wie wir Musik wahrnehmen.
- Niedrige Frequenzen (etwa 20 Hz – 250 Hz) entsprechen den tiefsten Tönen die wir hören. Sie werden von Instrumenten wie dem Bass, der Bassdrum und der Tuba erzeugt. Tiefe Frequenzen verleihen der Musik ihren Körper und werden ebenso sehr gespürt wie gehört; oft werden sie körperlich als Schwingungen wahrgenommen.
- Die mittleren Frequenzen (ca. 250 Hz – 4.000 Hz) werden im Allgemeinen mit dem ‘Körper’ der Musik in Verbindung gebracht. Dieser Frequenzbereich umfasst den Großteil der Klänge, die von Musikinstrumenten und der menschlichen Stimme erzeugt werden. Er wird oft als der Bereich angesehen, der der Musik ihre Wärme und ihren Klangreichtum verleiht.
- Hohe Frequenzen (ca. 4.000 Hz – 20.000 Hz) beziehen sich auf die Töne mit der höchsten Tonhöhe. Sie werden von Instrumenten wie Becken, Flöten und bestimmten Synthesizer-Klängen erzeugt. Hohe Frequenzen verleihen der Musik Brillanz und Klarheit.
Diese drei Frequenzbereiche ergänzen sich zu einem rundum gelungenen Klangerlebnis. Ein ausgewogenes Verhältnis zwischen diesen drei Bereichen ist für eine hohe Klangqualität unerlässlich. Aus diesem Grund verbringen Tontechniker beim Abmischen und Mastern einer Musikaufnahme viel Zeit damit, die Pegel von Bässen, Mitten und Höhen anzupassen.
Verstärkung
Der Begriff „Verstärkung“ bezieht sich im Zusammenhang mit Audio und Musik auf die Anstieg oder Abfall des Signalpegels in einem Audiogerät oder einer Software. Es wird oft mit der Lautstärke verwechselt, aber es gibt einen der feine Unterschied zwischen den beiden. Während die Lautstärkeregelung den Ausgangspegel des Tons steuert, den Sie hören, regelt die Verstärkung den Eingangspegel des Audiosignals. Die richtige Einstellung der Verstärkung ist entscheidend, um eine optimale Klangqualität zu erzielen und Verzerrungen zu vermeiden. Ist die Verstärkung zu hoch, kann das Audiosignal “abgeschnitten” oder “übersteuert”,” was zu unerwünschten Verzerrungen führt. Ist die Verstärkung hingegen zu gering, kann das Signal zu schwach sein, sodass der Ton nur schwer zu hören oder ordnungsgemäß aufzunehmen ist. In Musiksoftware, Die Verstärkung lässt sich oft mit einem Schieberegler oder einem Verstärkungsregler einstellen, So können Sie die Verstärkung oder Dämpfung des Schalls ganz nach Ihren individuellen Bedürfnissen optimieren.
Audio-Ein- und Ausgänge
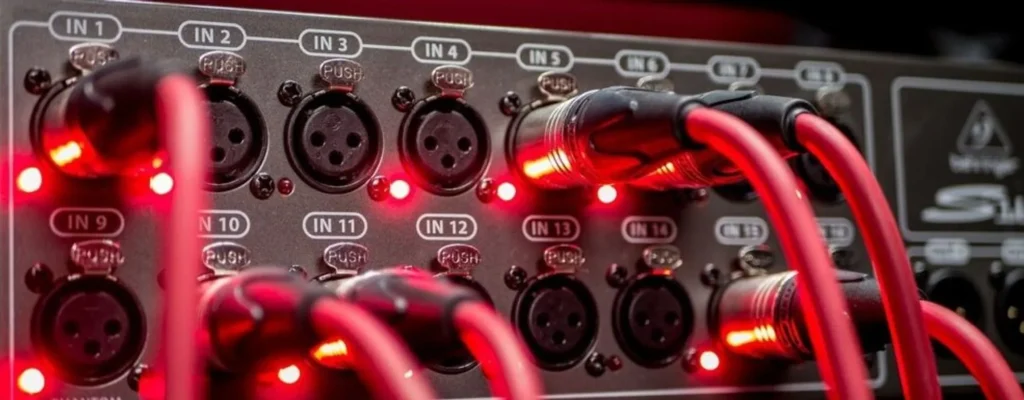
Ein Computer verfügt über verschiedene Arten von Audioein- und -ausgängen, über die Sie verschiedene Audiogeräte zum Aufnehmen und Abspielen anschließen können.
- Audioeingang (Line-In): Dieser Eingang dient in der Regel zum Anschließen externer Audioquellen, wie beispielsweise eines Musikplayers, eines Mischpults oder eines Musikinstruments. Der Ton dieser Geräte kann dann vom Computer aufgenommen oder bearbeitet werden.
- Audioausgang (Line-Out): Über diesen Ausgang wird der Ton vom Computer an externe Geräte wie Lautsprecher, einen Verstärker oder ein Mischpult weitergeleitet.
- Mikrofoneingang (Mic In): Dieser Eingang ist speziell für Mikrofone ausgelegt. Er verfügt häufig über einen Vorverstärker, um das in der Regel recht schwache Mikrofonsignal zu verstärken.
- Kopfhörerausgang (Headphone Out): Dieser Ausgang ist für Kopfhörer optimiert. Er weist in der Regel einen niedrigeren Ausgangspegel als der Line-Ausgang auf und ist häufig mit einem Lautstärkeregler ausgestattet.
- Digitale Ein- und Ausgänge (SPDIF, HDMI, USB, Thunderbolt): Diese Anschlüsse ermöglichen die Übertragung digitaler Audiosignale, die mehrere Audiokanäle (z. B. Surround-Sound) unterstützen und eine bessere Klangqualität bieten. Sie werden in der Regel zum Anschluss von High-End-Geräten wie Heimkinosystemen oder professionellen Audio-Interfaces verwendet.
- USB-, Thunderbolt- oder FireWire-Audio-Interfaces: Diese Schnittstellen sind externe Geräte, die zusätzliche Audioein- und -ausgänge bereitstellen und häufig für professionelle Audioaufnahmen und -produktionen verwendet werden.
Es ist wichtig zu beachten, dass die genau verfügbaren Anschlüsse je nach Modell und Marke des Computers variieren können und dass einige moderne Laptops aufgrund ihres kompakten Designs möglicherweise über weniger Anschlüsse verfügen.
Analyse und Synchronisation
In HeavyM befindet sich das Modul „Tempo- und Audioanalyse“ im Sequenzer am unteren Rand der Benutzeroberfläche.
Das Tempo-Modul
Um Ihr mapping dynamischer zu gestalten, Sie können Ihre Effekte im Takt animieren. Das kann als kleiner Trick dienen, wenn du kein gutes Mikrofon hast, um deine Effekte mit dem Ton zu synchronisieren: Passe einfach das Tempo von HeavyM an den Rhythmus der Hintergrundmusik an, und schon erweckst du den Eindruck, dass Ton und Animationen miteinander verbunden sind!
Festlegen eines BPM-Werts
Sie können im Eingabefeld einen Tempo-Wert festlegen oder im Takt auf das TAP Schaltfläche, und der Wert passt sich Ihrem Tempo an. Dieser Wert wird angegeben in Schläge pro Minute (BPM) und muss zwischen 20 und 999.
Anhand der visuellen Anzeige am unteren Rand des Moduls können Sie überprüfen, ob das Tempo Ihren Vorstellungen entspricht: Der kleine gelbe Balken bewegt sich entsprechend dem eingestellten Tempo. Wenn Sie die TAP-Taste verwenden, müssen Sie einige Male im Rhythmus klicken, damit der BPM-Wert genau berechnet werden kann.
Der “Neu synchronisieren” Die Schaltfläche dient außerdem dazu, das Tempo anzupassen: Klicken Sie darauf beim ersten Schlag eines Takts in Ihrer Audiodatei, um die visuelle Anzeige auf den ersten Takt zurückzusetzen.
Den BPM-Wert mit einer anderen Anwendung verknüpfen
Schau doch mal bei dieser Artikel um zu erfahren, wie man den Tempowert von HeavyM mithilfe von Ableton Link.
Auswahl einer Audioquelle
Wenn Sie das Modul zur Klanganalyse aktivieren, wird standardmäßig eine Audioquelle ausgewählt (sofern mindestens eine verfügbar ist). Klicken Sie auf das Zahnrad-Symbol, um das Einstellungsfenster zu öffnen, und wählen Sie eine andere Quelle aus der Dropdown-Liste in der Titelleiste aus.

Zu den verfügbaren Eingaben können gehören:
- Mikrofone: wenn Sie während Ihres Auftritts Umgebungsgeräusche aufnehmen möchten.
- Audiodateien die Sie in das Projekt importiert haben: Ab Version HeavyM 2.11 wählen Sie die “HeavyM – Zeitachse und Abläufe (Audio)” Geben Sie dies ein, damit die Audiodateien, die der Zeitleiste hinzugefügt wurden oder in den Sequenz-Einstellungen festgelegt sind, bei der Wiedergabe analysiert werden.
- Die Audioausgabe Ihres Computers: Manchmal ist die Qualität Ihres integrierten Mikrofons nicht besonders gut, sodass möglicherweise Störgeräusche aufgenommen werden. Oder vielleicht haben Sie gar kein Mikrofon und möchten den Ton direkt von Ihrem Computer verwenden. Ihr Computer steht in HeavyM nicht direkt als Audioquelle zur Verfügung, aber es gibt Möglichkeiten, diese Funktion zu nutzen: Suchen Sie unter Windows nach dem Stereo-Mix Eingabe auf der Registerkarte „Aufnahme“ der Sound-Systemsteuerung. Auf dem Mac gibt es keine native Lösung, aber Sie können Audio-Routing-Lösungen wie Soundflower (Eine kurze Anleitung von einem englischsprachigen Nutzer hier!).
Verstärkung einstellen
Sie können die Gesamteingangsverstärkung einstellen um den von Ihrer Audioquelle gesendeten Signalpegel fein abzustimmen. Sie können ihn mit dem gelben Schieberegler auf der linken Seite des Moduls oder im Einstellungsfenster anpassen. Darüber hinaus enthält das Einstellungsfenster für jeden Frequenzbereich eine eigene Verstärkungseinstellung, um eine höhere Präzision zu erzielen. Nehmen Sie Anpassungen vor, während Ihre Audioquelle aktiv ist bis die Werte im Spektrum zufriedenstellend sind.
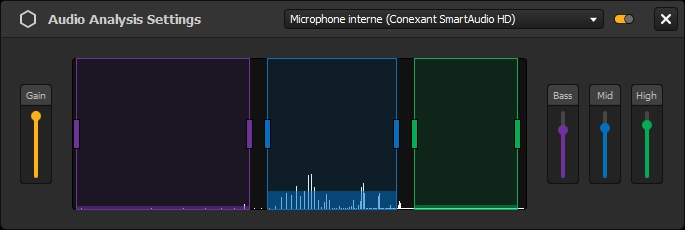
Hinweis: Im Allgemeinen verfügen Audio-Interfaces, die als Eingänge verwendet werden, auch über einen Verstärkungs- oder Lautstärkeregler. Bei integrierten Mikrofonen finden Sie diesen beispielsweise unter Systemeinstellungen… → Ton unter macOS, oder durch Mit einem Rechtsklick auf das Lautstärkesymbol in der Taskleiste gelangen Sie unter Windows zu den Soundeinstellungen..
Anpassung der Frequenzbereiche
Wenn die Audioanalyse aktiviert ist, können Sie beobachten, wie die kleinen Anzeigen im Modul reagieren, sobald ein Ton erkannt wird. Diese Balken entsprechen den Durchschnittswerten, die für jeden Frequenzbereich im Einstellungsfenster berechnet wurden: Tieftöne, Mitten, Höhen.
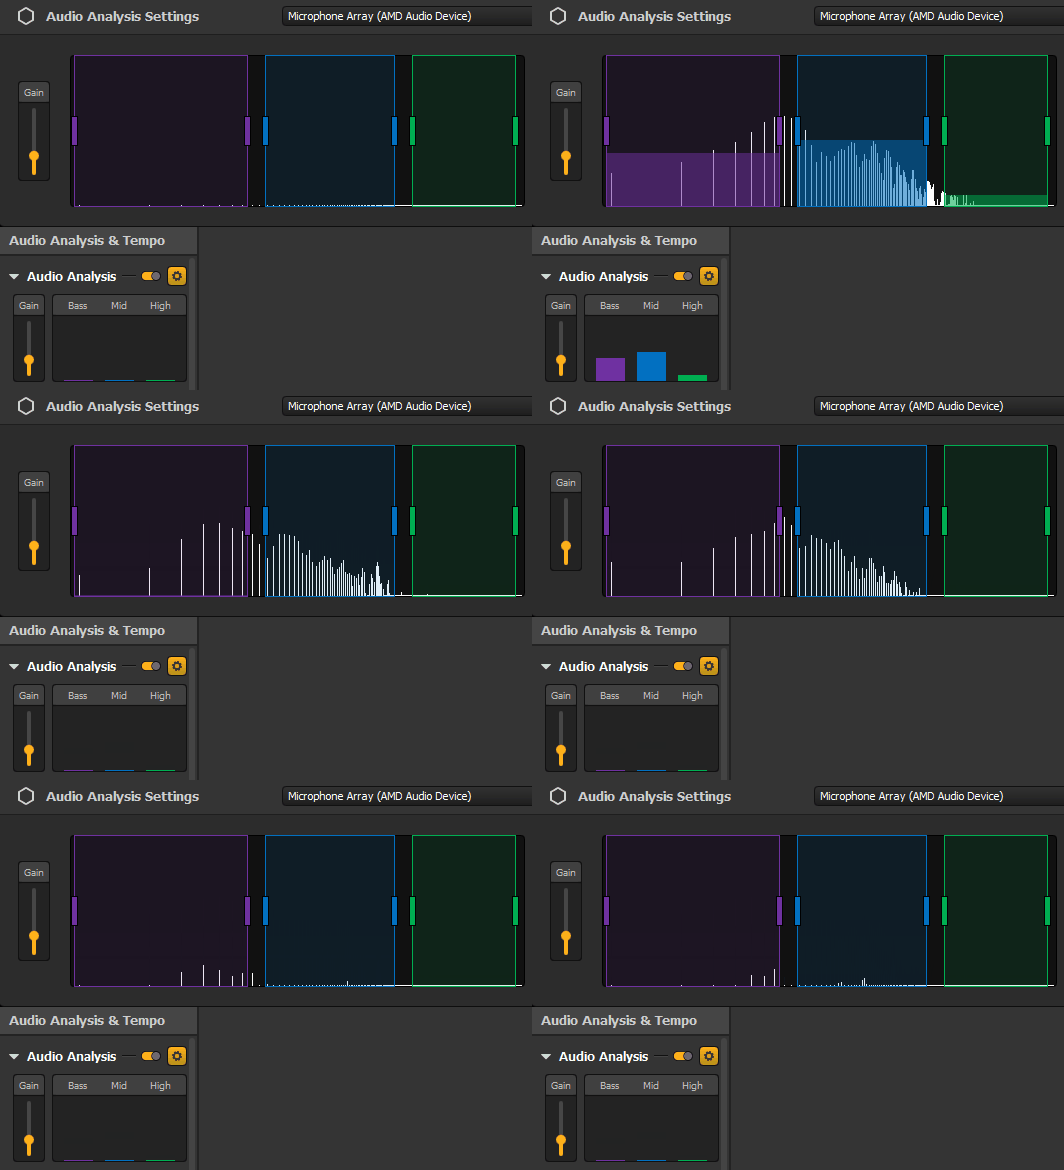
Die für jeden Frequenzbereich berücksichtigten Grenzwerte lassen sich im Spektrum von den tiefen bis zu den hohen Frequenzen (von links nach rechts) anpassen. Wenn ein Balken mit dem berechneten Durchschnittswert hoch erscheint, weisen die Frequenzen in diesem Bereich in Ihrem Tonmaterial einen hohen Pegel auf.
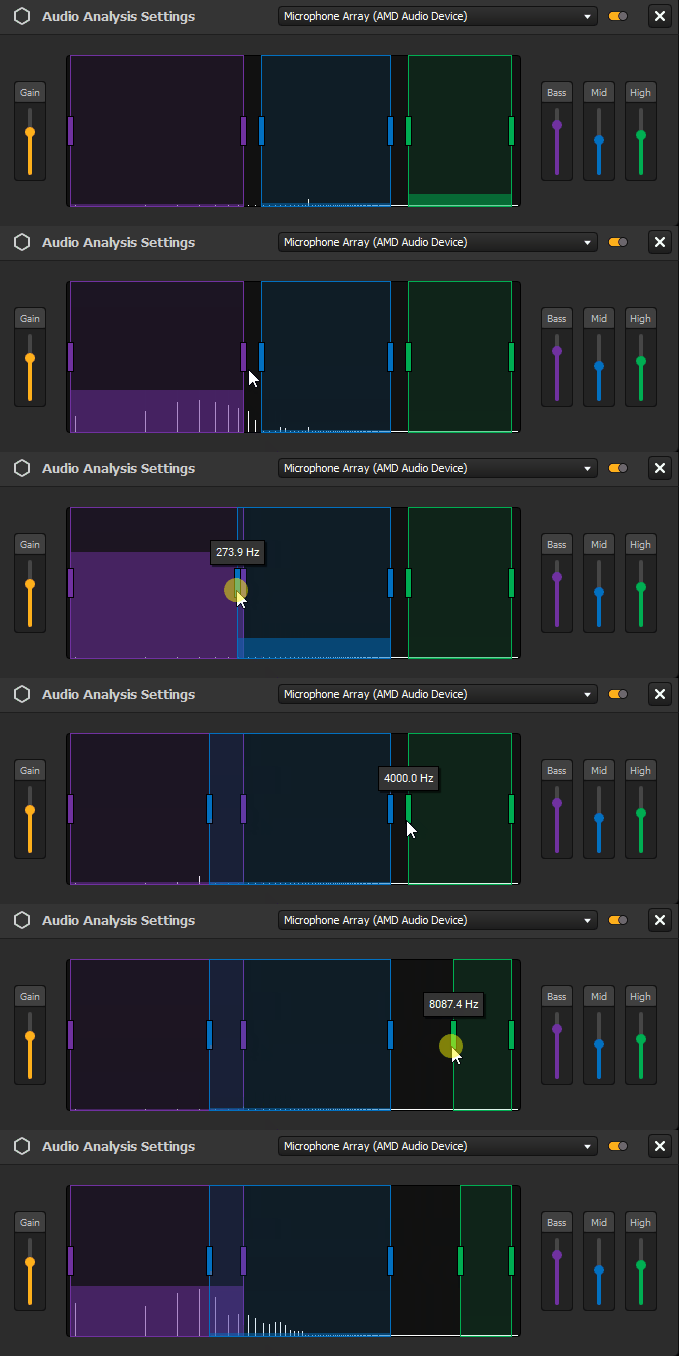
Sie können Ihre Effekte später so einstellen, dass sie auf diese verschiedenen Bereiche reagieren. Standardmäßig, Bass enthält die tiefsten Frequenzen, Mitte deckt einen Teil der mittleren Frequenzen ab, und Hoch umfasst die höchsten Frequenzen.
Hinweis: Ein Frequenzbereich darf nicht lückenhaft sein. Die vier kombinierten Bereiche müssen jedoch nicht das gesamte Spektrum abdecken und können sich auch überschneiden.
Effekte auf Klang oder Tempo reagieren lassen
Sobald Sie das Tempo und die Tonbereiche festgelegt haben, können Sie damit beginnen, Effektparameter miteinander zu verknüpfen, damit diese sich entsprechend einem Rhythmus oder Klang verändern.
Alle kompatiblen Parameter verfügen links über ein kleines Dropdown-Menü mit verschiedenen Optionen. Diese Parameter finden Sie in Gruppeneffekten, Sequenzen, Playern und Übergängen.
Unsere dieser Artikel um zu sehen, wie diese Varianten aussehen und wie man sie findet.
Weiter
Live-Interaktion mit einem video mapping
Dieser Leitfaden wurde verfasst von HeavyM, ein Unternehmen, das sich seit 2013 auf video mapping spezialisiert hat.
Bei Fragen, Anmerkungen, Vorschlägen usw. nutzen Sie bitte dieses Kontaktformular: https://help.heavym.net/hc/requests/new. Eine Antwort wird innerhalb von 24 Stunden garantiert.
Häufig gestellte Fragen (FAQ)
Was ist audio-reaktives projection mapping?
Beim audio-reaktiven Mapping handelt es sich um eine Technik, bei der sich visuelle Effekte und Animationen in Echtzeit dynamisch anhand von Audio-Eingaben ändern. Die Software analysiert den Takt, die Lautstärke und bestimmte Frequenzen (wie Bässe oder Höhen) der Musik, um automatisch visuelle Veränderungen auszulösen.
Wie verbinde ich Live-Musik mit meiner mapping-Software?
Sie haben drei Hauptmöglichkeiten: Verwenden Sie das integrierte Mikrofon Ihres Computers, um Umgebungsgeräusche im Raum aufzunehmen, nutzen Sie ein direktes Line-In-Kabel von einem DJ-Mischpult oder einer externen Soundkarte für ein sauberes Signal oder verwenden Sie virtuelle Audiokabel, um den internen Ton des Computers direkt in Ihre Software zu leiten.
Muss ich programmieren, damit die visuellen Effekte auf die Musik reagieren?
Nein, Programmierkenntnisse sind nicht erforderlich. Zwar nutzen fortgeschrittene Generative-Art-Künstler möglicherweise Code, doch moderne und benutzerfreundliche projection mapping software wie HeavyM verfügt über eine integrierte Soundanalyse-Engine. Sie synchronisiert visuelle Effekte automatisch mit der Musik und macht so die Audio-Reaktivität auch für Anfänger zugänglich.