

Projection Mapping Projector Guide: Throw Ratio & Specs
TL;DR
Choosing a projector for video mapping requires calculating the throw ratio (distance divided by image width) to select the correct lens. You must also dimension the lumen output based on ambient light and your surface area. Avoid extreme optical corrections; instead, rely on intuitive software like HeavyM to easily warp and map your shapes without degrading image quality.
Turning the constraints of your location into clear hardware choices is the foundation of a successful video mapping project. To achieve a sharp, high-contrast image without extreme corrections, you need to understand projection ratios, zoom limits, and light output.
👉 Ready to test your hardware? Download the HeavyM free trial and map your first surface in minutes!
What is Throw Ratio in Projection Mapping?
In video projection, we generally don’t use focal length in the same way as we might in photography or
cinema.
Instead, the projection ratio and projection distance are used to define either:
- The optics that will be used for a given distance and screen base.
- The distance range within which the projector must be located to achieve the desired image size.
- The minimum and maximum size that can be projected with a given lens and distance.
To calculate it, use this simple formula:
Throw Ratio = Projection Distance / Image Width
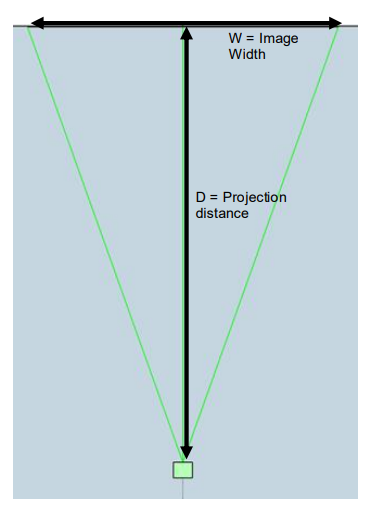
By defining two of these values, you can easily find the third. This calculation tells you exactly which lens to buy or rent, or exactly where to place your projector to cover your architectural canvas.
The 4 Categories of Projector Lenses
Depending on the available space, you will need to choose one of the following lens categories:
| Lens Type | Throw Ratio | Best For | Considerations |
| Ultra-Short Throw (UST) | < 0.5 | Display cases, interactive walls, very little distance. | Requires ultra-precise placement; risk of hotspots. |
| Short Throw (ST) | 0.5 – 1.0 | Small rooms, close mapping, tight scenes. | Sensitive geometry; limited lens shift options. |
| Standard | 1.2 – 2.0 | General cases: halls, stages, medium facades. | Offers a placement margin (zoom) and frequent lens shift. |
| Long Throw (Telephoto) | > 2.0 | Long distances, grandstands, deep buildings. | Uncluttered technical areas; possible loss of useful lumens. |
Zoom and Projector Placement
A zoom lens allows you to adjust the image size without physically moving the projector. It defines a range of projection ratios (from minimum to maximum).
TANGIBLE IMPACT ON INVESTMENT
- The wider the zoom range, the more flexible the placement.
- Aim for the middle of the range (neither too wide-angle nor too telephoto): better sharpness, uniformity, and
adjustment margin. - At the telephoto end of the zoom (maximum ratio): possible loss of brightness and less tolerance for blurring.
WHAT ZOOM DOES NOT DO
- Zoom does not change the offset (beam height) or angle.
To center the image: use lens shift (first) or reposition the projector.
ERRORS TO AVOID
- Work at the zoom limit (maximum wide angle or maximum telephoto).
- Relying on the keystone to make up for a bad investment.
ZOOM AND PLACEMENT CHECKLIST
- Check the ratio range of the lens (technical data sheet).
- Calculate min–max distance based on the target image width.
- Choose a location that is ideally in the middle of the range, to allow for adjustment.
👉 Need to align your visual content perfectly? HeavyM’s built-in drawing tools make it incredibly easy to trace your physical surface. Try HeavyM today!
How Many Lumens Do You Need for Projection Mapping?
To calculate your brightness needs, you first need to understand two key terms:
- Lumens (ANSI): The light output of the projector (the manufacturer’s value).
- Lux: The actual light received by the projection surface, measured with a lux meter.
- The Logic: The brighter your environment (higher lux), the more lumens you need to maintain image contrast.
The Quick Calculation Formula:
Required lumens = 3 × Ambient lux × Surface area (m²)
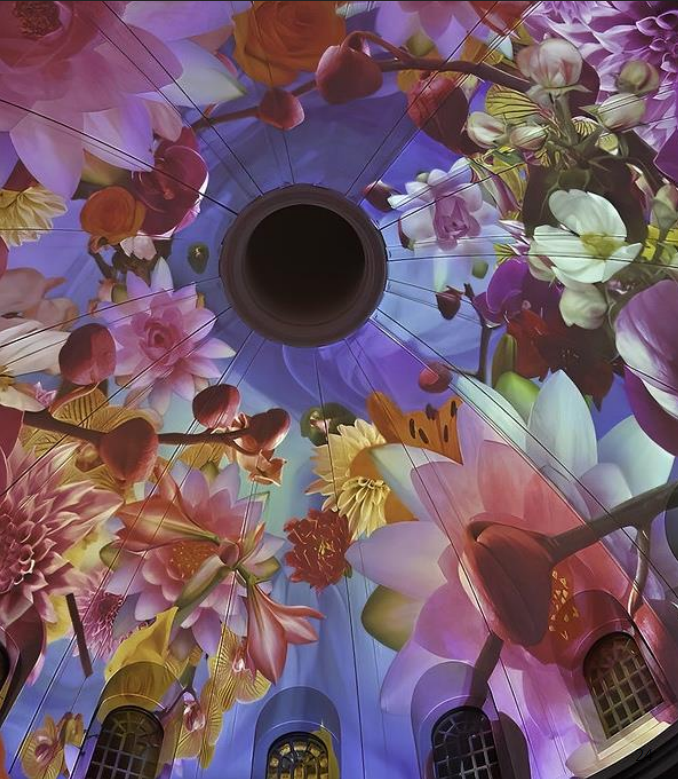
Example: For a room with 40 lux and a 12 m² surface, you need: 3 × 40 × 12 = 1,440 lumens (this is the absolute minimum required for a realistic image mode).
Express Method & Field Benchmarks
To quickly estimate your hardware needs, follow this 3-step method:
- Estimate the lighting: Dark (<10 lux), semi-controlled (30–50 lux), or bright (>200 lux).
- Calculate the area: Width × Height.
- Apply the formula and compare it with the projector’s output.
| Environment | Ambient Light | Recommended Lumens |
| Dark Interior | < 10 lux | 3,000 – 5,000 lumens |
| Semi-Controlled | 30 – 50 lux | 6,000 – 8,000+ lumens (or reduce surface area) |
| Bright / Daylight | > 200 lux | Projection not recommended (consider LED screens) |
PRO Tip: Be careful with technical data sheets. Manufacturers often use “dynamic” or “presentation” modes that degrade colors to inflate lumen counts. Use accurate image modes (like cinema/sRGB) to assess true usable brightness. You can check this with a full-size test chart; if fine lines appear washed out, you need more light.
What If You Hit the Brightness Limit?
If your projector isn’t bright enough for the room, you can salvage your setup by applying these fixes:
- Reduce the projection surface area.
- Darken the room.
- Stack projectors (overlaying the same image with two projectors to combine light output).
- Divide the image into zones using edge blending.
- Simplify your content by using high contrast and minimal fine text.
What Factors Affect Your Visual Rendering?
Even with the right amount of lumens, real-world conditions can reduce your useful brightness. Keep these factors in mind:
- Distance and Optics: Zooming into the “telephoto” position or projecting from an excessive distance causes a loss of light output.
- Surface Size vs. Power: For a given light output, making your projection surface larger decreases illumination. (Field rule: If you double the surface area or if the environment is 2× brighter, aim for 2× more lumens).
- Surface Material: A light-colored, opaque surface reflects much more light than a dark, non-opaque surface.
- Environment & Maintenance: Ambient light pollution, a smoky venue, or simply a dirty projector filter will drastically reduce your useful lumens.
Comparing Projector Light Source Technologies
When choosing your hardware, the light source technology is just as important as the lumen count. Here is an objective comparison to help you choose:
| Technology | Advantages | Disadvantages |
| Laser (Phosphor) | Immediate ON/OFF, tens of thousands of hours of operation, stable flow, consistent colors, 360° orientation tolerance, low maintenance. | Slightly higher purchase price. |
| Lamp | Lower entry price, large selection of used models. | Aging technology (bulbs contain mercury and will soon be banned), warm-up/cool-down time, more noise/heat, limited orientation, 10x shorter lifespan than laser. |
| LED | Instant start-up, long service life, very low maintenance, stable colors, quiet and compact. | Limited power (best suited for small surfaces or very dark rooms). |
👉 Need to blend multiple projectors to boost your lumens? HeavyM makes edge blending and multi-projector setups accessible to everyone. Try HeavyM for free today!
Resolution & Pixel Density: Understanding the Math
To guarantee a sharp and professional projection, you must understand how your projector’s digital pixels translate to your physical surface. Here are the four essential metrics you need to master for projection mapping:
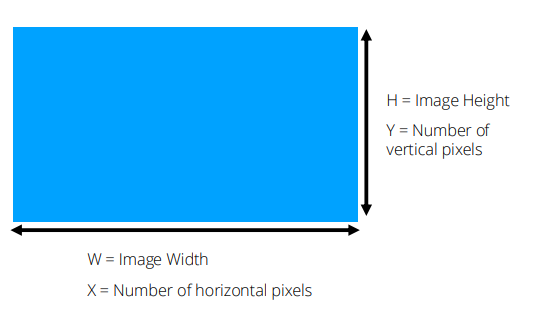
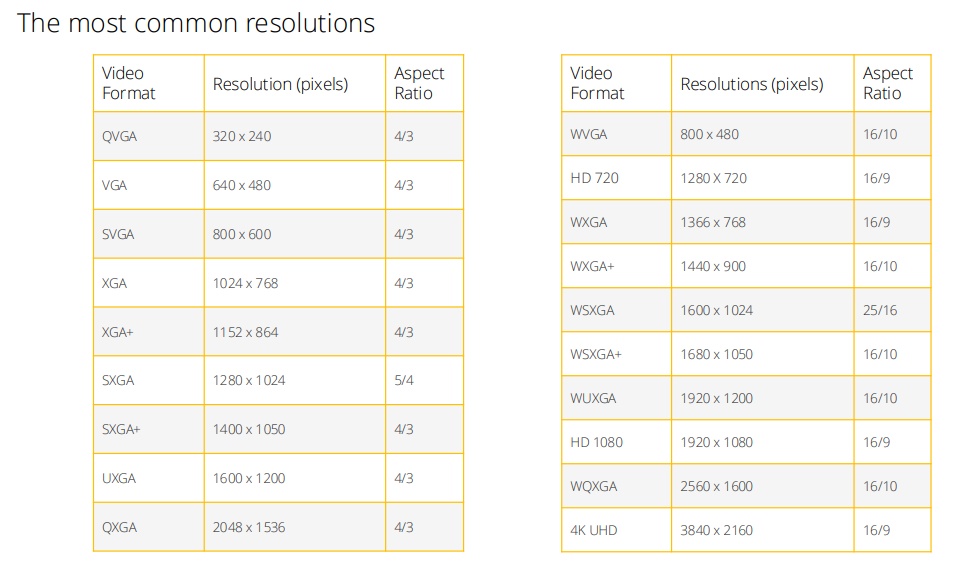
- Resolution (X; Y): This is the exact number of horizontal (X) and vertical (Y) pixels that make up your image. Example: 1920 x 1080.
- Aspect Ratio (X/Y or W/H): This is the ratio between the width and height of your image, which depends directly on your chosen resolution. Example: A 1920 x 1080 resolution creates a 16:9 aspect ratio.
- Pitch (X/W or Y/H): This defines the physical size of a single pixel on your wall. At the exact same resolution, the more you enlarge the image, the larger each pixel becomes.
- PPI (Pixels Per Inch): Calculated using the formula
25.4 / PITCH (mm). This measures your overall pixel density and image sharpness.
How to Adjust Your Image for the Audience
The closer your audience is to the projection, the smaller the pitch needs to be to prevent a blurry, pixelated look. To achieve a smaller pitch, you have two options: increase the projector’s resolution or reduce the physical image size.
- The Golden Rule: If your audience is 5 meters away from the projection surface, you should aim for a minimum PPI of 10.
👉 Tired of calculating aspect ratios manually? HeavyM’s intuitive interface automatically adapts to your projector’s native resolution and output. Download the HeavyM free trial and focus on your creativity, not the math!
Frequently Asked Questions (FAQ)
What does throw ratio mean for projectors?
Throw ratio is the relationship between the projection distance and the width of the projected image. It helps you determine exactly how far back your projector needs to be to cover your specific projection surface.
How do I calculate the lumens needed for projection mapping?
A reliable field formula is to multiply your ambient light (in Lux) by 3, and then multiply that number by your total projection surface area in square meters.
Should I use the projector’s built-in keystone feature?
It should only be used as a last resort. Extreme keystone adjustments via the projector hardware can degrade image quality and add latency. It is highly recommended to physically place the projector correctly and use professional video mapping software like HeavyM to handle warping.
What is the difference between Lens Shift and Zoom?
Zoom changes the size of the projected image without moving the unit. Lens shift physically moves the optical block to shift the image vertically or horizontally without causing trapezoidal distortion.
How does audience distance affect projection mapping resolution?
The closer your audience is to the projection, the higher the pixel density (PPI) needs to be to avoid a pixelated image. If you enlarge an image without increasing the resolution, the physical size of each pixel (the pitch) grows. As a general guideline, if your audience is 5 meters away, you should aim for a minimum of 10 Pixels Per Inch (PPI).