

Руководство по Видеомэппингу с использованием нескольких проекторов
Коротко
Когда одного проектора становится недостаточно из-за больших размеров поверхности, недостаточной световой мощности или требований к разрешению, возникает необходимость в использовании мультипроекции. В данном руководстве объясняется, в каких случаях следует использовать проекторы в режиме «стека» или «смешивания», приводятся строгие правила синхронизации выходного сигнала, а также подробно описывается пошаговый процесс смешивания изображений, позволяющий добиться безупречного визуального результата.
Когда одного проектора становится недостаточно с точки зрения площади проецирования, светового потока, разрешения или места установки, необходимо объединить несколько проекторов для формирования единого изображения. Установка нескольких проекторов требует точности, специальной синхронизации и строгой методики, чтобы конечная картинка выглядела цельной.
👉 Готовы без труда объединить работу нескольких проекторов? Скачайте бесплатную пробную версию HeavyM и позвольте нашим встроенным инструментам для сглаживания краев взять на себя всю тяжелую работу!
Когда следует использовать несколько проекторов?
Вам следует перейти от конфигурации с одним проектором к конфигурации с несколькими проекторами в следующих случаях::
- Площадь поверхности слишком велика: В темной комнате площадь изображения превышает ~20–25 м² (а в светлом помещении — еще больше).
- Недостаточная светоотдача: Даже при работе на полной мощности изображение остается недостаточно контрастным, из-за чего приходится “накладывать” проекторы друг на друга, чтобы увеличить световой поток.
- Недостаточная плотность пикселей: Для мелкого текста или мелких деталей требуется больше пикселей, что делает необходимым “мозаичное” отображение с сглаживанием краёв для повышения видимого разрешения.
- Ограничения по размещению: В связи с расстоянием до экрана, соотношениями, препятствиями или тенями для более полного охвата сцены требуется съемка под разными углами.
- Ожидаемое дублирование (критически важные системы): В целях безопасности на каждую зону требуется по два проектора; если один из них выйдет из строя, изображение останется видимым.
- Сложные форматы: Проекционная поверхность очень широкая, очень высокая или имеет глубокий рельеф, поэтому её необходимо разбить на участки, которые проще откалибровать.
Наложение слоев против сглаживания по краям
В зависимости от поставленной цели вы будете использовать один из двух основных методов многопроекционного отображения. Вот сравнение, которое поможет вам выбрать подходящий метод:
| Характеристика | Складирование | Сглаживание краев |
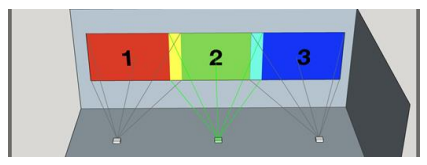
| Определение | Наложение одного и того же изображения с помощью двух или более проекторов с целью объединения световых потоков в одной области. | Размещение нескольких проекторов рядом (или друг над другом/под друг другом) с зоной перекрытия, в которой применяется плавный переход. |
| Когда его использовать | Площадь поверхности достаточна, но световой поток недостаточен, либо для обеспечения резервирования в целях безопасности. Не используйте эту функцию для увеличения изображения. | Поверхность слишком велика/высока для одного проектора или для увеличения кажущегося разрешения. |
| Необходимые условия | Идентичные проекторы (одинаковая оптика, источник света и наработка), одинаковое разрешение, частота и EDID, синхронизированные выходы, жесткое крепление. | Идентичные проекторы (оптика/источник света) и абсолютно одинаковые настройки. |
| Технические реалии | Фактическое увеличение яркости составляет ≈ +80–90% (не ровно в 2 раза). Окончательная резкость изображения будет соответствовать уровню менее резкого из двух проекторов. | Требуется выравнивание проекторов и применение программной кривой сглаживания для плавного объединения изображений. |
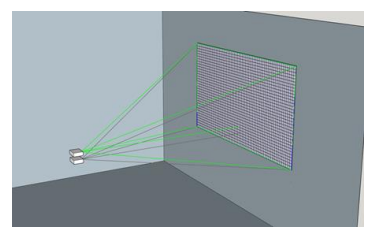
Как и когда синхронизировать выходные сигналы проекторов?
Синхронизация вывода гарантирует, что все изображения обновляются точно одновременно на каждом проекторе или экране.
Видимые эффекты без синхронизации: Если ваши выходы не синхронизированы, вы заметите разрывы изображения, мерцание по краям во время сглаживания и постепенный сдвиг в течение нескольких кадров. Линии или объекты будут выглядеть обрезанными на стыках, границы слияния будут пульсировать, видеоциклы перестанут плавно сливаться через несколько минут, и вы заметите неравномерную задержку с микрозадержками на каждом выходе.
Когда синхронизация просто необходима:
- Слияние изображений или мозаичное отображение (использование нескольких проекторов для проецирования одного и того же изображения).
- Расположенные рядом экраны, которые зрители могут видеть одновременно.
- Анимированные элементы (текст или движущиеся объекты), которые пересекают несколько поверхностей.
- Выступления в режиме реального времени с музыкой или артистами, которым необходим стабильный ритм.
Когда синхронизация НЕ требуется:
- При использовании одного проектора.
- Отдельные поверхности, на которых отображается полностью независимое содержимое (между ними нет пересекающихся объектов).
- Статический контент (неподвижные изображения), визуальные элементы с небольшим количеством движения или кратковременное использование.
- Экраны, расположенные в разных физических зонах, где зрители не могут сравнивать их одновременно.
Простое правило: Если зрители могут сравнивать две грани одновременно, необходимо обеспечить синхронизацию. В противном случае можно смириться с асинхронностью, но для предотвращения неожиданностей следует сохранить настройки неизменными..
👉 Управление несколькими выходами может быть сложной задачей. HeavyM упрощает рабочие процессы с использованием нескольких проекций. Попробуйте HeavyM уже сегодня чтобы легко управлять несколькими выходами с одного компьютера!
Каковы основные понятия технологии сглаживания краев?
Цель сглаживания границ заключается в том, чтобы область перекрытия стала совершенно незаметной, когда несколько изображений образуют единое визуальное целое. Суть заключается в том, чтобы создать контролируемое перекрытие, а затем применить кривую плавного перехода (затухание), чтобы яркости суммировались, не создавая ярких бликов.
Точный порядок выполнения операций (всегда следуйте ему)
Чтобы получить идеальную смесь, выполните следующие шаги именно в указанном порядке:
- Идеальное расположение компонентов: Убедитесь, что проекторы установлены перпендикулярно и ровно.
- Настройка оптики: Отрегулируйте фокус, зум и смещение объектива, чтобы линии были параллельными (по возможности установите трапецеидальное искажение на ноль).
- Точная геометрия: При необходимости примените небольшую программную деформацию.
- Определите перекрытие: Установите область перекрытия равной 10-20% от ширины изображения.
- Примените кривую сглаживания: Старайтесь избегать линейных кривых, так как они часто слишком заметны; отдавайте предпочтение косинусоидальным или S-образным кривым.
- Выровнять выходной сигнал: Сравните значения яркости, гаммы и цветовых настроек/баланса белого для всех проекторов.
- Проверьте схему: Проверьте конечный результат с помощью сетки и градаций серого.
Распространенные ошибки, которых следует избегать
Даже опытные специалисты могут допускать ошибки при смешивании. Будьте предельно внимательны и не попадайтесь в эти распространённые ловушки:
- Перекрытие слишком узкое: Если величина перекрытия меньше 10%, на месте соединения появится выделение или видимая линия.
- Неудачно выбранная кривая: Неправильно выбранная кривая смешивания приведет к появлению заметной полосы яркости или темного участка на изображении.
- Калибровка цвета не учтена: Если проекторы не настроены на одинаковую цветовую гамму, в зоне перекрытия появится совершенно другой оттенок.
👉 Готовы создавать безупречные иммерсивные среды? HeavyM предлагает передовые и удобные в использовании функции сглаживания границ. Загрузите HeavyM прямо сейчас и начните создавать грандиозные проекции!
Часто задаваемые вопросы (FAQ)
В чём заключается разница между наложением и сглаживанием краёв?
Слоирование заключается в наложении абсолютно одинаковых изображений, проецируемых несколькими проекторами, на одну поверхность с целью повышения общей яркости (что обеспечивает коэффициент усиления примерно 80–90%). Слияние краёв (или «мягкие края») позволяет размещать проецируемые изображения рядом друг с другом или друг над другом/под другом с перекрытием 10–20% для создания единого изображения, значительно большего размера и с более высоким разрешением.
Какой размер перекрытия необходим для сглаживания краев?
Для плавного и незаметного перехода между двумя проекторами необходимо создать зону перекрытия, охватывающую от 10% до 20% по ширине изображения. Если зона перекрытия составляет менее 10%, возникает риск появления заметной линии или резкого перехода на стыке.
Почему края моей сглаженной проекции пульсируют?
Пульсирующие края, разрывы или обрезанные линии на стыках возникают, когда выходы проекторов не синхронизированы должным образом. Если несколько проекторов формируют единое изображение, их частоты и выходы должны быть идеально синхронизированы, чтобы смена кадров происходила в одну и ту же миллисекунду.
Какую кривую сглаживания следует использовать при многопроекционной визуализации?
Следует избегать использования линейной кривой плавного перехода, так как при этом область перехода часто остается слишком заметной. Вместо этого лучше использовать косинусоидальную или S-образную кривую, которые обеспечивают плавное затухание света, благодаря чему яркость от обоих проекторов плавно суммируется, не выделяя зону перекрытия.